
This post may contain affiliate links. Please read my privacy policy.
Looking to learn how to make homemade beef jerky? Look no further, here you will learn step by step instructions on how to make beef jerky in a dehydrator. This includes everything from choosing which meat to use, slicing said meat, marinating with a great recipe, dehydrating the jerky, and testing for when it's finished.
Jump to:
🎥 Watch how to make beef jerky
🐄 Choosing the best cut of meat
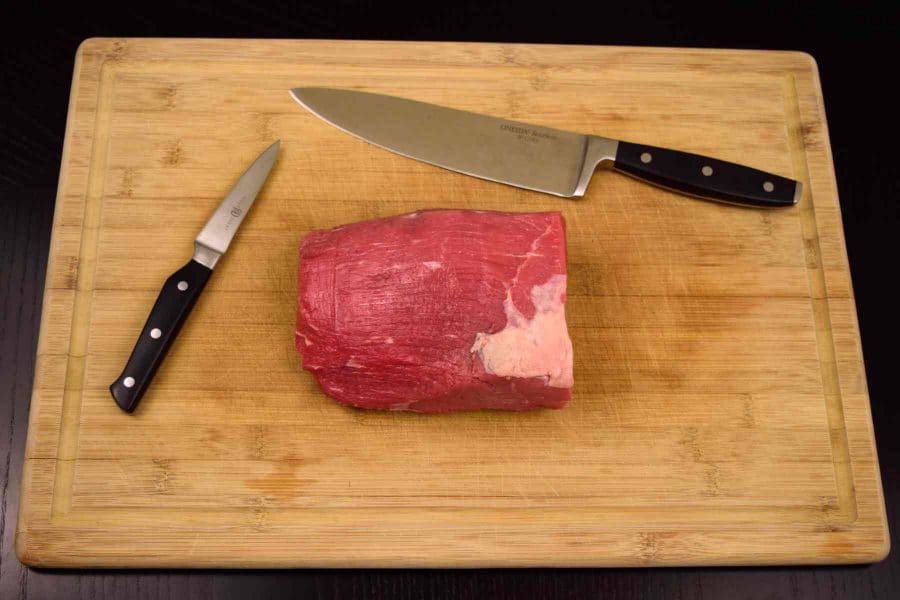
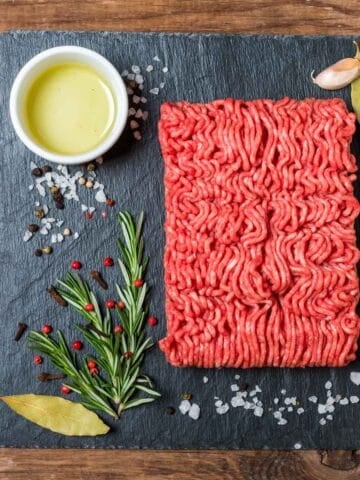
Step 1 - Start with a lean piece of meat. The goal is to find a piece of meat that has as little fat as possible.
Best Meat:
- Eye of Round Roast
- Top & Bottom Round Roasts
- Flank Steak
- Sirloin Tip
- Ground Beef (10% fat or less)
I used a 2lb Beef Eye of Round for this beef jerky recipe.
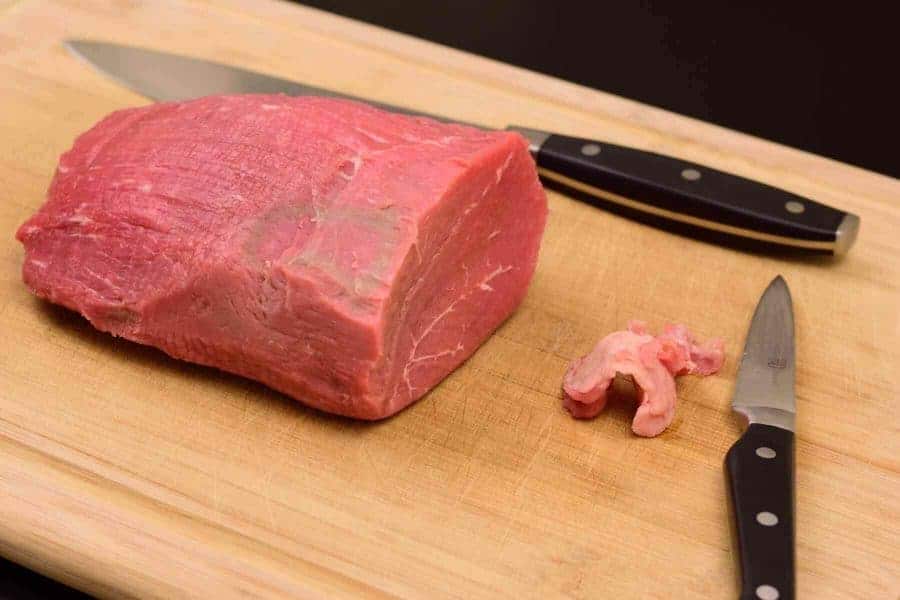
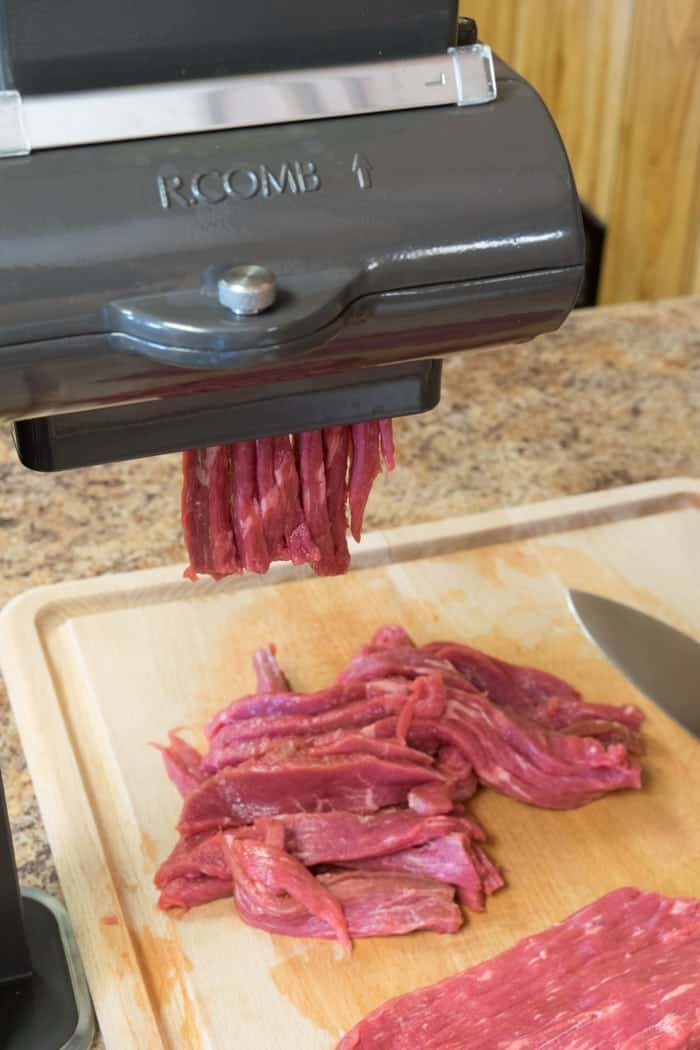
🥩 How to slice the meat
Step 2 - Trim off the fat cap and other visible fat from the meat. Fat will make meat spoil faster, so removing as much fat as possible now will extend the shelf life of your finished beef jerky.
Step 3 - Place the beef in the freezer for 1-2 hours to partially freeze for easier uniform slices. Your meat should be hard to the touch but not fully frozen.
This is one of the most important steps when learning how to make beef jerky. Slice the meat against the grain of the meat around ⅛"-¼" thick for an easier chew or with the grain for a more chewier beef jerky.
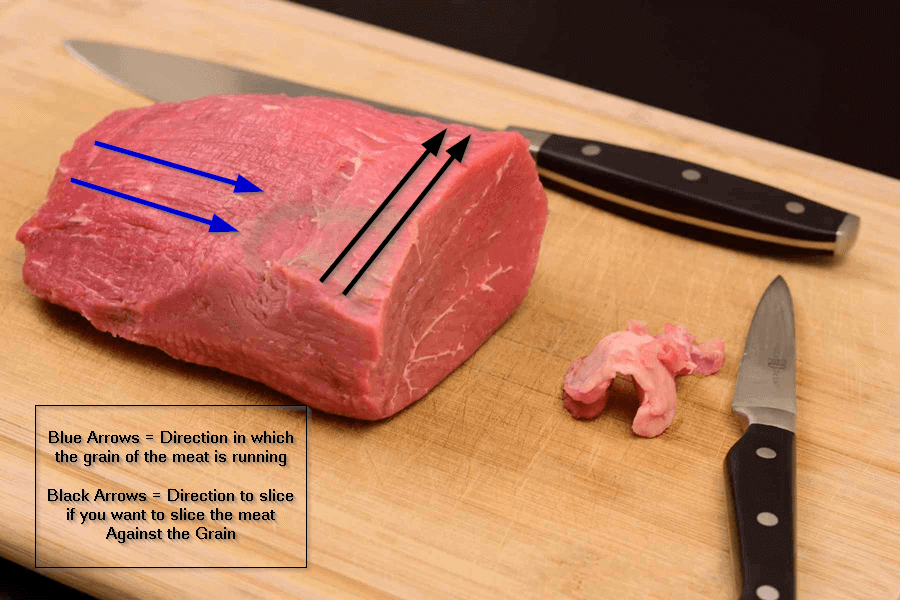
The way you slice the meat has a big impact on the final texture and whether you will have a tough or soft beef jerky. If you need more information on slicing meat, visit my slicing meat for beef jerky page.
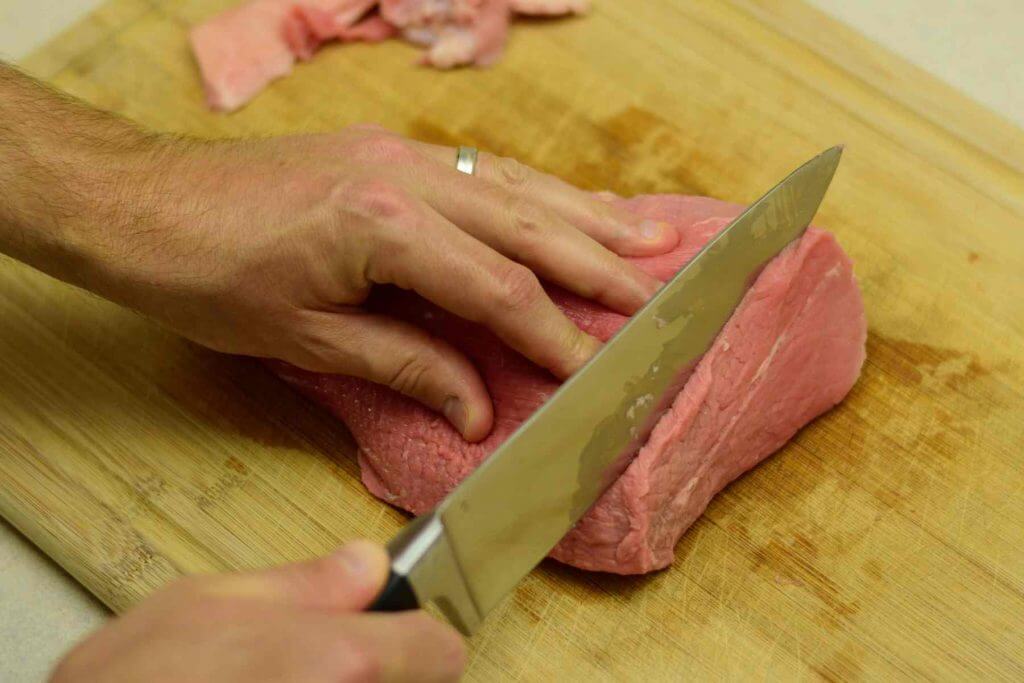
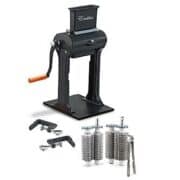
You can also skip the freezing stage and slice your jerky using a jerky slicer. I use a Weston Jerky Slicer. It makes sure all your strips are the same width which allows them to dry evenly. Having a slicer is great when making a lot of beef jerky, if you are only making small batches every once in a while it is not as important.
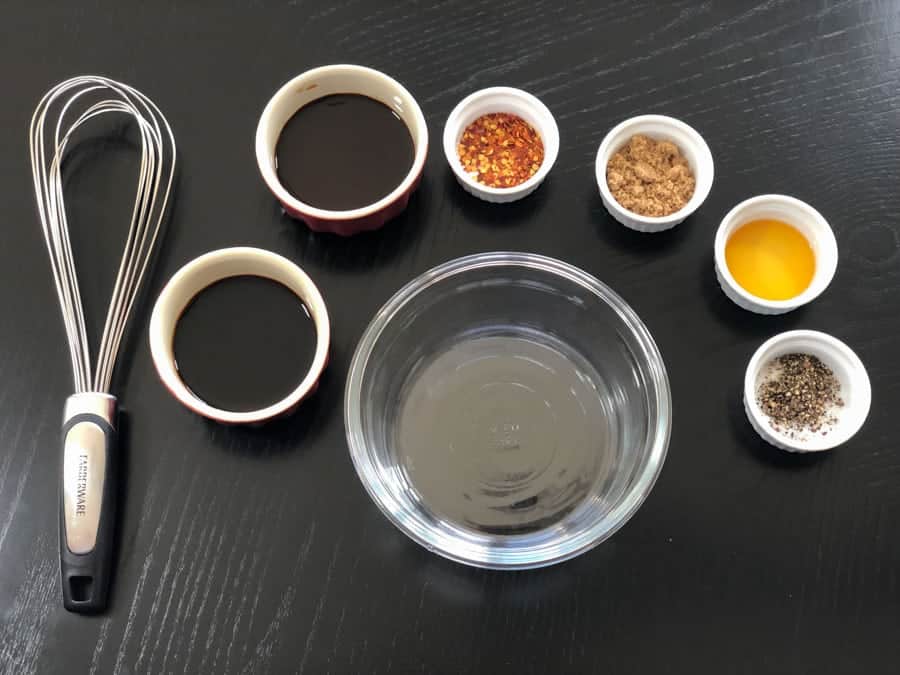
🧂 How to make the marinade
Step 4 - Finish slicing all of your meat and set aside. Now it's time to get the marinade ready. Mix all of the ingredients together in a bowl or ziplock bag and stir well. Since this recipe doesn't have any whole peppers, a blender is NOT needed.
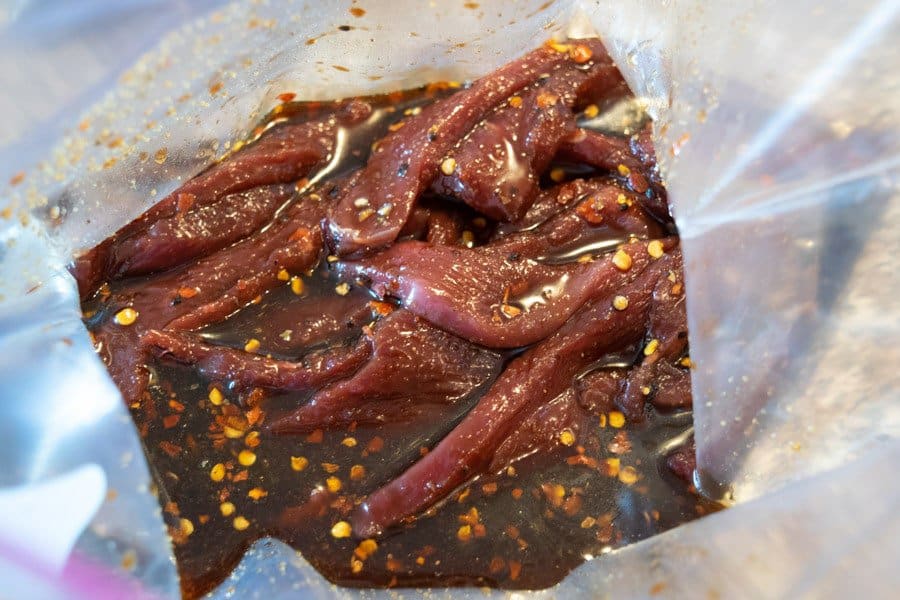
Step 5 - Add the beef strips and shake the container so all the meat is evenly covered with the marinade. Marinate in the refrigerator anywhere from 6 to 24 hours for great flavor, the longer the better. This beef was marinated in the fridge for 18 hours.
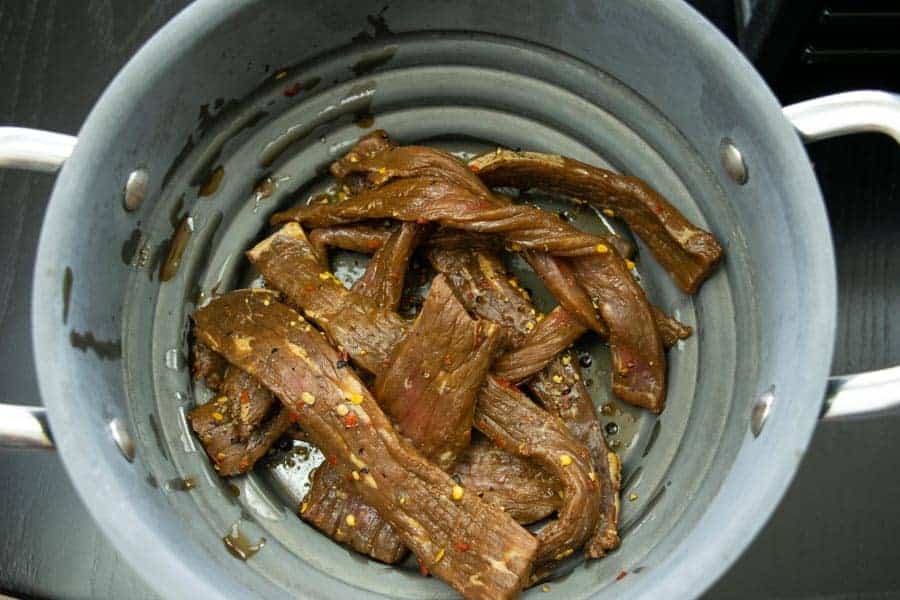
Step 6 - After marinating, drain and pat dry the jerky strips to remove any excess marinade before dehydrating. This helps in speeding up the dehydration process.
⏲️ Drying the jerky
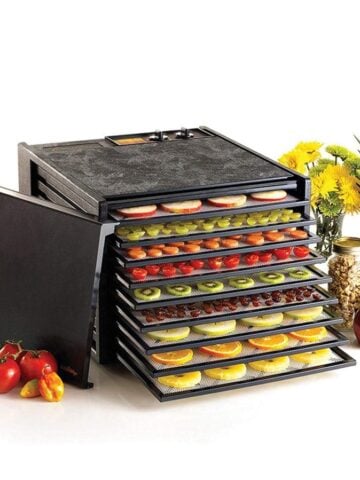
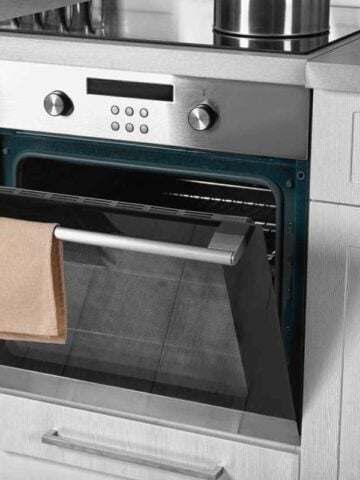
Step 7- It's time for the easy part! As I mentioned above, I used my Excalibur Dehydrator for this batch. Place the beef strips on the racks making sure that they are not touching or overlapping.
Leaving space in between the beef jerky slices allows the air to better circulate and dry the meat.
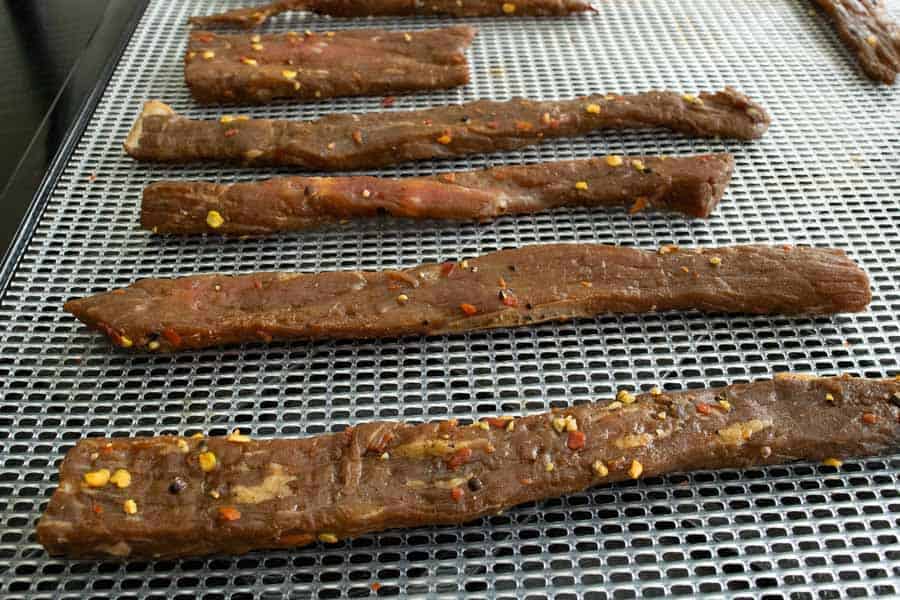
Step 8 - Beef jerky takes around 4-5 hours to dry when dehydrating. Turn the dehydrator to 165° and let it run for about 4 hours until the internal temperature of the jerky reaches a safe 160° as per guidelines from the USDA. Depending on how thick your slices are will determine how long it will take to finish dehydrating, this beef jerky took 5 hours to dry.

🌡️ How to tell when it's finished drying
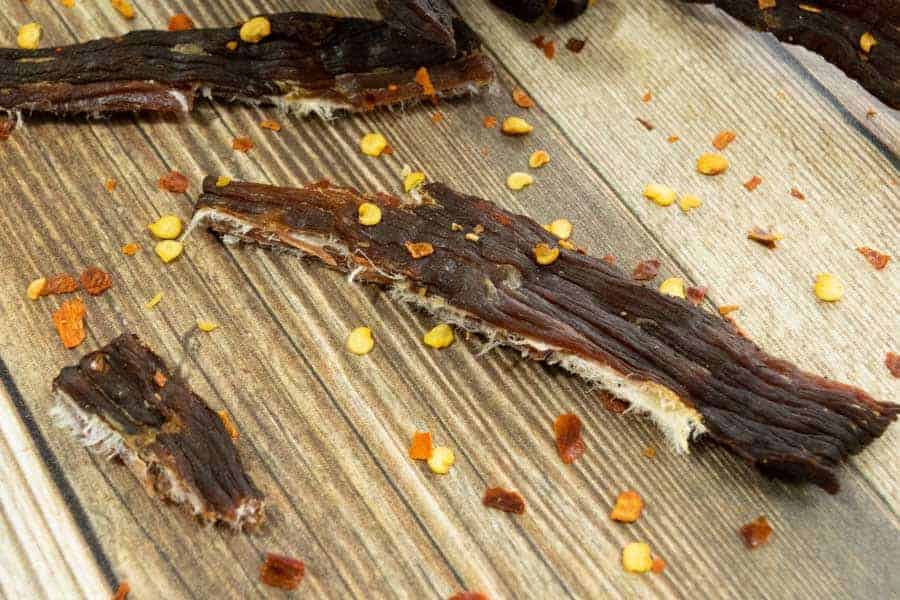
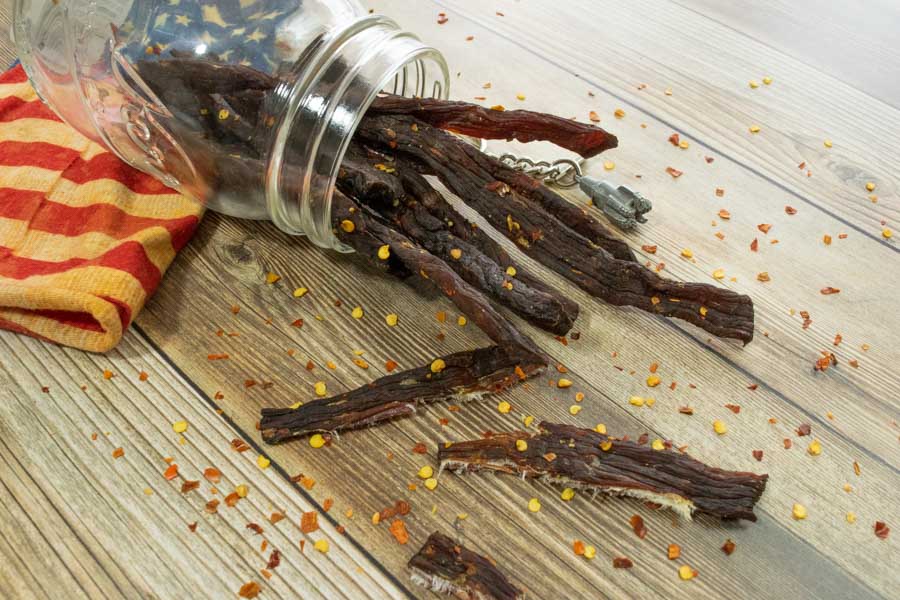
Step 9 - Make sure you check your beef jerky throughout the drying process to avoid over drying. The jerky will be done when it bends and cracks but does not break in half. You will also see white fibers within the meat. If it's done, let it sit on the rack and cool for a couple hours.
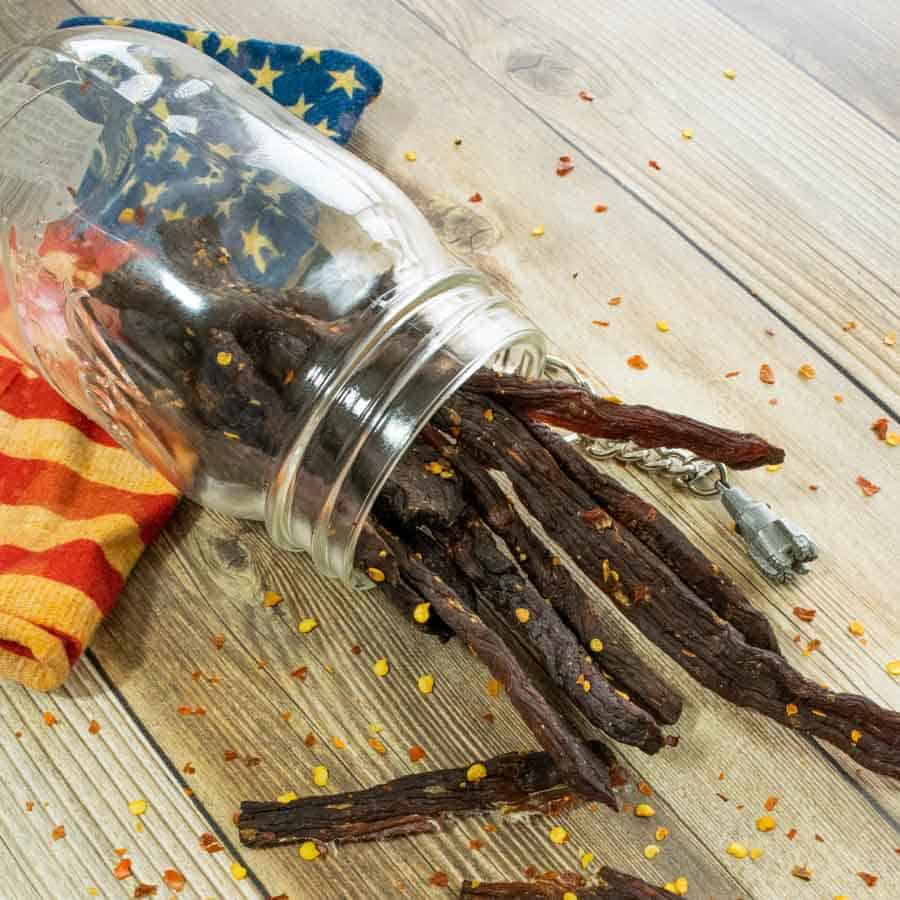
Step 10 - Now it's time to either store the beef jerky in ziplock bags, vacuum sealed bags, glass jars, or my favorite; your stomach! Beef jerky will stay good for 7-10 days if kept in ziplock bags. For longer storage, using vacuum sealed bags will allow the jerky to last 1-2 months. Please visit my page on storing beef jerky for further information.
That's it! Those are the 10 easy to follow steps when learning how to make beef jerky at home.
💭 FAQ
The Excalibur Dehydrator is my favorite. There are others that will work great as well. Check out this post where I have tested and reviewed the top selling dehydrators for jerky.
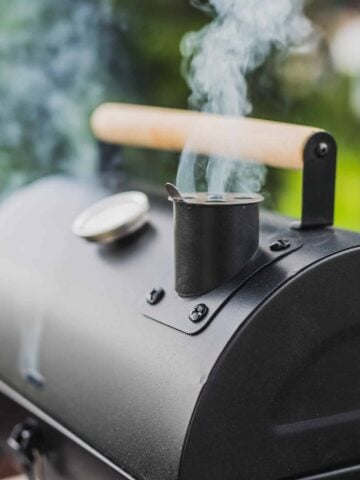
No. Using an Oven or Smoker is another great way to make jerky.
Right here on Jerkyholic, we have over 100 great tasting recipes and marinades for making all types of jerky.
👨🏽🍳 Old Pro Tips:
- Use a sharp knife or partially freeze the meat before slicing. Here is my Slicing Meat Page for more information.
- Using a ziplock bag allows you to use less ingredients, saving money on marinades. Put meat in the ziplock bag and roll it up expelling all of the air inside. This allows all the meat to be covered by a relatively small amount of marinade.
- The longer you marinate, the more flavor the jerky will have. If I have time, 18 hours in the minimum I marinate my meat.
- Take jerky strips out of dehydrator and allow to cool for 5 minutes before checking to see if it's finished. It should bend and crack but not break when finished. You should also see white fibers in the meat when bent.

Ingredients
Lean Beef
- 1 lb eye of round
Marinade
- ¼ cup worcestershire sauce
- ¼ cup soy sauce
- 1 teaspoon black pepper
- 1 teaspoon salt
- 2 teaspoon brown sugar
- 2 teaspoon liquid smoke
- 1 teaspoon red pepper flakes
Optional
- ¼ teaspoon Curing Salt (Prague Powder #1)

Instructions
- Pick a lean cut of beef. Trim the fat cap and other visible fat. After trimmed, place the meat in the freezer for 1-2 hours or until partially frozen. This will allow for more uniform slices when cutting your beef.
- In a plastic container that has a tight fitting lid or ziplock bag, add the marinade ingredients and mix well.
- Remove the meat from the freezer and slice ¼" strips against the grain for an easy chew. Cut with the grain for a more chewy jerky.
- Add the sliced meat to the marinade and shake well until all slices are covered evenly. Place in the fridge and allow to marinate for 6-24 hours. Shake the container/bag two or three times while marinating.
- After marinating, dry slices with paper towels to remove any excess marinade.
- Place strips on your dehydrator drying racks with plenty of spaces in between for easy air flow.
- Dry for 3 hours at 165 degrees allowing the internal temperature to reach 160 degrees and then turn down to 145F. Check the meat after 4 hours and keep drying until the jerky bends and cracks, but does not break in half.
- Allow jerky to cool for several hours before storing.
Video
Pro Tips
- Trim all fat from the meat before marinating for longer lasting jerky once it's finished drying
- Use curing salt or celery juice powder to extend the life of the jerky
- Marinate closer to 24 hours for the most intense flavor
Jason Bolt
This was AWESOME!!! A little too Hot for my taste, so next time I'll use half the amount of red pepper flakes.
Otherwise OUTSTANDING!! SUPERB!!!
Make ya want to Slap your Mama GOOD!!!
Will
Good to hear! Adjust it to your liking for sure.
Ben Andrews
Can you use a deli slicer with the thickness around 19mm (3/4inch) to cut the meat?
I dont think Id be able to use the manual thing, not with my disability.
Will
You can. I would not slice at 3/4" though. Closer to 1/4" works better for jerky.
Lj
We use a deli slicer. I wouldn't make jerky without it! Though you'll want to go thinner than 19mm. Anywhere from 6-8mm is good. And you'll still want to chill it in the freezer for an hour before slicing just as if found it by hand to minimize drag.
Pete Niko
Totally agree with LJ. I did go 11mm for my first go just to see how a meatier Jerky would go. 6-8mm is the correct rule of thumb.
Gary
Use black pepper instead of red pepper it won't be so hot .
Use meat grinder instead of sliced meat.and make strips.
Karen Third
Can you freeze the finished jerky to extend its life? Will it lose quality?
Will
You can freeze it for up to a year. It will still be good quality, but once you defrost eat within a couple of days.
Annie
Will be trying this recipe this weekend, sounds good! Have never taken the internal temp of jerky before, with it being so thin, how do you do this? Thank you!
Will
It can be very tricky, especially with thin jerky. A meat thermometer is your best bet. If the jerky is very thin, making sure you heat the jerky throughout drying will ensure an adequate internal temperature.
Annette
How do you store finished jerky?
Will
Go to my storing beef jerky page for information.
Barney Google
Obviously your not gonna be able to accurately probe a slice of dried jerky. Temperature shouldn't even be a consideration since your not "cooking" it but drying the product. I think the author is covering their butt to avoid someone getting sick and coming back on them. One thing I will add that most "internet chefs" rarely emphasize with jerky recipies. Food safety practices when your preparing non cooked meats are extremely important. You can follow them to a T and have the cleanest work space and still have issues because of the nature of this process. Most bacterias won't die at the temps meats are dried. I hear people all the time mention how they want to start selling their home made jerkies and get rich. Or worse their already selling jerky out of their kitchen. Very big no no. Your setting yourself up for trouble. Not to scare anyone but you really need to understand the limitations and potential issues with this process.
Will
Hey Barney. Some good information here, some bad info. I have this information on the site, mainly on my beef jerky safety page.
1. You can probe a piece of meat when drying to make jerky. It's best to use a thin meat probe. You are not getting the temperature when the jerky is totally dried, it's normally 1-2 hours in to heating when the meat is still pliable. If you are making extremely thin jerky, then no you will not be able to use a meat probe but shouldn't need to if you dry on the highest temperature setting, it will be cooked.
2. You 100% are cooking the meat. All commercial jerky you buy in stores is cooked. This is required by law to prevent food borne illness. Commercial operations also have to monitor humidity and have a certain time frame they need to cook the meat before they dry the jerky. Can you risk not heating it. Sure, but the possibility of getting sick increases drastically.
3. This "internet chef" is not covering his butt. I simply don't want any of my readers getting sick by following bad advice. That is why I teach how to make jerky safely.
4. Having a clean environment is definitely important as you mention. Washing hands, marinating meat in the fridge and not at room temperature, clean utensils and knives. Good advice. As you mention, most bacteria won't die if meat is dried at low temps. This is why it's dried at high temps at the beginning of the cooking/drying process; to kill bacteria.
5. There are strict rules for making and selling beef jerky. You will not be able to do it out of your home kitchen as you mention. You will need dehydrators/ovens that can monitor and adjust humidity while cooking the meat before drying. It's important to raise the internal temperature of the meat at the beginning of the drying process while moisture is present due to bacteria having the ability to become "heat tolerant" after the moisture is removed through dehydrating.
Matt
I have some beef in my freezer. Will there be an issue with flavor, texture, etc. if I use use beef that has been frozen? Fresh is always better, just curious if you've had experience with this. Also I love the site, I have adapted your teriyaki recipe to make it spicier and it is great, and the instructions are great also. Thanks!
Will
Using frozen is totally fine. Glad you like the teriyaki recipe. Spicy teriyaki sounds good!
Matt
So use your teriyaki recipe, add a sprinkle of cumin, 2 tsp of crushed red pepper, 1 tbsp crushed chiltipen, 2 tsp minced garlic and 1 tsp red chili powder. I'm making about 1.5 lbs next week for a trip and I'm going to add a ghost pepper this time.
Nancy Kontos
Bottom round is now $5.50lb in MN. I used Sirloin on sale for $3.99 we will see how this works, I have been making jerky for 40 years, and always used Top or Bottom round.
Michael Cotten
I'm a bit confused by the 165 degree recommendation found throughout your site for beef. While the FDA recommends an internal temperature of 165 for poultry and 160 for ground beef, the recommendation for beef, pork, veal and lamb is 145 degree. Not knocking you or your directions as you have a great site full of very good recipes and information. And better safe than sorry I guess. But 165 for four hours out of five seems like I'll be cooking the meat rather than just dehydrating it. Dehydrators do vary of course, but it seems to me that reaching an internal temperature of at least 145 degrees for even a short period is sufficient to kill harmful bacteria, after which the goal is just to dry the meat to remove excess moisture. The reason I mention this is that I have an older Oster dehydrator with a simple on/off switch. The manufacturer says it reaches 140-185 degrees. I'm testing it now to see what it actually does. I did also buy a new dehydrator with temp (165) and time control, but then realized that my old one may have worked just fine... If so, I can do larger batches which isn't a bad thing.
Will
So the recommended temperature for beef jerky is 160°F and 165°F for poultry. If you are grilling a steak where the meat has been minimally handled and not sliced before cooking, 130°F is fine because bacteria stays mainly on the surface of the meat (which is higher temp then the interior) and doesn't penetrate into the middle. But when you are slicing beef into thin slices for jerky this means it has been handled more which can introduce bacteria and no longer is 1" thick which is hard to penetrate. This is why ground beef is recommended to 160°F, it's not a solid piece of beef. It's been ground up giving it lots of surface area and has been handled a lot more.
When grilling or cooking in a pan, the cooking process is pretty quick and there is moisture. When jerky is dehydrated slow, it stays in that "danger zone temp" much longer. It's also pulling out the moisture which can make bacteria become more "heat resistant" and able to live at higher temperatures. This is why beef jerky is recommended to be heated to 160°F.
The USDA temperature recommendations for cooking beef are NOT the same as the USDA recommendations for making jerky. Hope this helps.
Kevin Gary Smith
I bought an excalibur 5 tray at Good Will for $9.99 good temp control and set timer on stove. Works great. The people at work love my jerky. Does the higher rack stay at same temp as lower rack? should I rotate the racks? Please advise.
Will
I rotate the trays, not top to bottom, but 180° since the fan is in the back. This way the jerky that was at the back is now at the front of the dehydrator.
Guthrie
Great answer. That’s helpful!
Kassandra
Thank you so much for that! I was curious about that myself, but that is a very thorough and easy to read explanation that makes perfect sense.
Todd Robison
I would say go off your intuition. If you like it a certain way, go with that
Scott Weaver
Better than our local meat shop!
george steadham
have a old but is new still in the box but no fan or temp control, 5 trays, don't know what temp it will reach, it gets hot, should i throw it away and buy another ? thanks
Will
I'm sure it will work just fine. Test the dehydrator on how hot it heats up and go from there. Revive that bad boy and put it to work!
Sam
Adapt. Get an oven thermometer and do a test run. Do the Alton Brown get up. An old cast iron pan and old an hot plate. Place smoking chips in pan. And go at it. Keep records.
Ron
Hi Will, I've just started learning to making jerky. I can't remember where I found the process I'm using, but after reading yours I think I maybe be over killing it. I set oven for 325 degrees, place marinaded (with pink salt) jerky on cookie sheet, and place in oven. Use temperature probe in meat until jerky gets to 160 degrees. Then I remove from oven and place in Nesco dehydrator at 160 degrees for 4 to 5 hours. Is this process overkill? Your thoughts please.
Will
Normally if I am using curing salt, I do not do the pre-heat in the oven. Pre-heating will change the texture of the jerky and I feel comfortable with my dehydrator getting the jerky to 160°F within 2 hours as well as having the curing salt.
Dan J
Hey Will,
Just starting out dehydrating and this recipe is a great base to venture off from. One thing I found is that Walmart sells Milanesa, which is top round presliced at around 1/8 inch and really makes things much easier. It's about a buck a pound more than the regular cut, but worth it IMO.
Cheers
Will
Yep. Milanesa cut meat is fantastic for making jerky. Really cuts down on the prep time!
Reggie
Thanks for your help on my first attempt to make jerky.
One question I have regarding the FDA's recommendation on the meat reaching a safe temp of 160. I'm not sure I buy it. The far more important question should be how long it takes to get to get your product into the safe zone. Once the meat gets to 135-145 the pathogens can no longer multiply. Bacteria may still be alive but will not reproduce. Then it becomes both time and temp that will kill the bacteria. Also known as pasteurization.
My Souse Vide device works on this same principle. I'm not saying that we should not cook our meat to 160. I am saying that pathogens are probably dead long before the temp reaches 160.
Will
Hey Reggie! Hopefully they are dead long before reaching 160°F, but better safe than sorry. When it comes to drying meat, the temperature and time to kill bacteria can be different than cooking meat quickly. Since the drying removes moisture and raises the meat temperature slowly, the bacteria can become more heat resistant and can live longer and at a higher temperature than if cooking quickly with moisture.
Dehydrating is definitely a little different when it comes to safety than the normal cooking of meat.
Douglas Louis
The reason to use curing salt is to kill the bacteria.
Ken Skipper
Hi Will,
I have modified the marinade ingredients to include teriyaki sauce, smashed garlic cloves, onion powder, chili powder, and cayenne pepper (dried powder). I have decided to put the mixture in a saucepan and warm for a while over low heat. My thinking is that the dry ingredients will dissolve, and this will give the garlic a chance to release more flavor into the mixture. I will then let the mixture cool before combining with the beef slices.
Have you ever pre-heated the marinade, and if so, did it have any noticeable effect on the final outcome?
Thanks.
Will
Hey Ken! I have heated the marinade before when using sugar in a recipe. It definitely helps dissolve sugar into the marinade and increases the flavor of the jerky. If using smashed garlic, it will definitely add more flavor to the recipe. But like you said, just make sure to let the mixture cool before pouring over the meat! Let me know how it turns out!
Ken Skipper
The batch is in the dryer now. I'll report back when it's done.
kenneth j skipper
Hi Will,
This batch turned out good. Not great, but plenty good. The flavor is a little too complex; I'll not add teriyaki sauce or chili powder in my next batch. The heat from the Cayenne pepper is nice. It's not too much, just a little zing after a bite or two.
Thanks for sharing your knowledge. The information in this page has been quite helpful for me.
Take care,
Ken
Will
They won't all turn out the be winners. It's nice to try different recipes and flavors! Glad I have been able to help.
sdallstar
Made 2lbs of round steak today. First try at beef jerky using my dehydrator and I followed this recipe. I am sold. A little heat, a little sweet. Thanks for the guidance.
Will
Glad you liked it! This is definitely a great one to make!
Karen James
I have a dehydration feature on my new stove and used this recipe to make my very first batch of beef jerky. Perfect amount of heat from the chili pepper flakes and sweetness from the brown sugar. I marinated the beef strips for 24 hours and the flavour soaked all the way through the meat. Fantastic! I highly recommend this recipe.
Jessica
I can't wait to try this recipe. Do you know if I could use honey instead of sugar in the marinade?
Will
Yes, honey goes great in jerky marinades. It will give the jerky a little bit more of a sticky feel, but tastes great.
jack
High quality flavored syrups can add different flavors to jerky that are fun to play around with. I use a mango syrup sometimes for a tropical flavor. A quarter cup of apple sauce also works well. Both are especially great with pork jerky. Friends love it but few guess exactly what flavor it is on the jerky. When you use a flavored syrup cut back some on any sugar you would otherwise use.
Jeannine
Questions???
In step 7 are you speaking of the internal temperature of the meat or the dehydrator?
And
Is it check
At the 4th hour or 4 hours after the first 3?
Seems it should be self explanatory but I always question to be sure.
Will
So you want to make sure the internal temperature of the jerky reaches 160F. It should take about 2-3 hours to reach an internal temperature of 160F. The jerky will not be finished drying though after only 2-3 hours. It will be safe to eat, but has not lost most of the moisture in the meat which makes it shelf stable. So continue drying until it's finished. (bends and cracks, should see white fibers when ripped in half). The TOTAL time to dry jerky should be about 4 hours. Place meat in dehydrator, turn dehydrator on, and let run 4 hours. Jerky should be finished.
Nicole Willis
We dried ours until it bent and there were white fibers. Let cool over night and put in a ziplock bag. Today is day 2 and there’s oil (?) collecting on the inside of the bag. Is that normal?
Will
If you didn't pat dry the jerky with a paper towel before dehydrating it's possible to have the inside dry but have some wet marinade on the outside of the jerky. You can help get rid of this by storing the jerky in a paper bag instead of ziplock bag for the first couple of days. It will help continue to dry the outside of the jerky after dehydrating.
Jeef Berky
"Step 7- It's time for the easy part!"
Ha! For me the drying is the hardest part. The whole house smells like jerky... but I have to wait until it's done. 🙂
Jere Cassidy
I am new to using the dehydrator and haven't used it with meat yet so this will be my first go at it. Your instructions are very helpful.
Amy Roskelley
I have the BEST dehydrator, but I've only made fruit in it. I am totally trying jerky next.
Don cook
I have a Rosewill dehydrator, not the best i know it only goes up to 158 degrees, how long do i need to leave the jerky on in this one to turn have it turn out the best in your opinion thanks in advance
.Don
Will
I have never used that dehydrator but if sliced 1/4" thick, about 4 hours will probably be a good time.
James S.
I have a Cabela’s “commercial grade” dehydrator. It goes up to 160 degrees. How much time should I dehydrate the marinated 1/4” sliced Beef weighing 2 1/2 pounds? Somewhere I read that you should put your newly dehydrated jerky in the oven afterward for 30 minutes at 165 degrees to make sure it is safe. Do you always need cure powder? All the spices should have liquid, not like a dry rub for a marinade? I am looking to do your Bourbon recipe. My first batch was a garlic pepper one. Thank you for your help, I ordered your book from Amazon.
Will
Hey James! I don't have that dehydrator but I would start checking the jerky to see if it's finished after 4 hours set at 160F. Heat treating the jerky in the oven after dehydrating is a technique to kill bacteria, but it should be much hotter than 165F. Do 10 minutes at 300F. If the dehydrator gets the meat to an internal temperature of 160F, you can skip that heat treatment. I'm not positive if that dehydrator heats the meat to that temperature though having never used it. You do not need curing salt, but it does help kill potential bacteria, gives jerky that classic 'jerky' taste and red color, and will extend the shelf life of the finished jerky. I always do a wet marinade instead of just sprinkling the seasoning on the meat because I feel like it results in more flavor, but it doesn't have to be a wet marinade. Good luck. Hope you enjoy the book!
Skylii Joyner
Hello. My husband and I are really new to making jerky. Our dehydrator only goes up to 145 degrees. Should we get a different one?
Will
Unless you pre-heat the meat in the oven to an internal temperature of 160F before drying in the dehydrator, you should get a new dehydrator that goes to 160F.
Mitko
Hey Will!
I put a rating even before tasting the jerky! I really appreciate the effort and time that you put in your awesome website! You make the things look easy and you want to share your secrets about jerky - my admirations and respect!
This is my 1st attempt ever! I have already marinated the meat and it's already in the fridge! 🙂 I am planning to start drying tomorrow afternoon and can't wait to see the result! I hope that it will be like the one on the photos that you shared!
Many thanks once again!
Stay healthy and best wishes, I will do my best to try everything and be active in here!
Will
Hope it turns out tasting great! Let me know, and thanks for leaving a comment.
Mitko
It turned out fantastic!
It was really thin in the end, but probably I should make bigger meat pieces, I cut like 3.5cm, next time I will try with 4cm.
I somehow didn't feel the smoky flavor, it may depend on the brand of the liquid smoke that I use, so next time I will use 2tsp instead of 1, and I will add 1 + 1/2tsp of salt.
In general I was totally stunned! I didn't believe that I will be able to make this at home, it turned out fantastic and it already hooked me up! 🙂 Tonight I will prepare "Dos Pepper Jerky" and "Best Beef Jerky Recipe"
I will leave my thoughts in the corresponding recipe pages!
Thanks Will!
See you around! 🙂
Will
Awesome! I like it when the jerky turns out tasting great! Yeah, it's so easy to make at home, you will be making a lot now... You are trying two of my favorite recipes next, hope they turn out good for you!
Mitko
I mean millimeters (mm), no cm - lol... We are not making steaks right?! 😀
Teresa
Thanks for all of the great recipes! I wanted to ask if lamb could be used instead of beef. I raise my own lamb so I want to try making some jerky.
Will
I have never made jerky out of lamb, but you can totally use these recipes on lamb. People make jerky out of virtually every meat there is. Let me know how it turns out!
Will
If you are referring to the Aroma Dehydrator that came in at #4, I also found that this machine did not reach the internal temperature of 160F. That is why in my review I stated that if you bought this dehydrator you would have to pre-heat the meat in the oven before drying. Unfortunately this changes the consistency of the jerky. I would try to return that dehydrator and get a Nesco, the #1 recommended dehydrator.
Jack Nisanov
Will,
You recipes and methods are concise and easy to follow!! Great job and thanks a million for a Sharing !
Jack from NY
Dan
Hey there Will , my name is Dan and i have a question for you , which i'm sure you have answered before .Well here goes i have done hamburger jerky before but , choosing a recipe that has VERY little liquid ingredients. 1-2oz of liquid per 1 pound of meat is about the perfect amount. (1oz liquid = 2tbsp) If there are no liquid ingredients, COLD water can be used to help mix seasonings and meat.Well with that being said ...what if there are a couple of liquid ingredients , soya sauce and Worcester sauce and some others liquids.Could a person take equal amounts of these liquids and mix together in a separate jar or whatever and then take the 1-2 OZ of the mixed mixture then add the 1-2 OZ to pound ?lol l well i hope you understand what i am asking .
thanks in advance Dan
Will
Yep, that's what I do. That is the best way to still get the flavor from the liquid ingredients but not use too much.
Lance
Hi, I just ordered a Dehydrator from amazon (Nesco garden master 1000watt.) on sale right now fo $61 if anyone is interested. Anyway I have never made jerky, but I have had home made jerky from friends and one guy I buy some from every so often. My main complaint is every one that I get it from makes it really salty. Does this recipe or any on the ones on you list have a moderate amount of saltyness to it?
Will
Good deal! You can always lower the amount of salt if you don't like salty jerky. Feel free to modify any recipe. Have fun Lance!
Darcy Burns
Don't at as much soy sauce and add liquid smoke that cuts back on the saltiness
Ratna Cook
you have same problem me, Lance.
every time I buy it from the fair or any bender always salty.
I think if we make our self just using soy sauce, we down need to put salt or put salt just like 1 Tsp.
when I made Asian bbq meat only put kecap manis ( Indonesian sweet soy sauce) and little bit salt, meat so tasty.
rick
do i keep the door on the dehydrator closed.it is old
Will
Closed
Tony R
Newbie question here 🙂 Do I need to dry the jerky after it's dehydrated? Just trying to get my timing correct. Thanks!
Will
Dehydrating the jerky is what dries it. The dehydrator will apply heat and air to dry the jerky out. If using a dehydrator, it should take around 4 hours to normally finish. Good luck Tony! Let me know how it turns out.
Michael
Hi Will, After marinating can I put the meat in the microwave to get it to 160F ?
Will
I have never thought about doing that Michael. Ha. As long as beef reaches an internal temperature of 160F you are good to go, I am not sure how long this would take though... I am going to try this as well the next time I make jerky to see how it turns out!
Rudy
Hi Will, I've never made jerky before, but I love the stuff! My son gave me a Nesco FD75 for Xmas and I'm trying to educate myself on all the do's and don'ts of making decent beef jerky. I found this website and learned a whole bunch of things while reading your and other people's comments. Can't wait to try your recipes.
I noticed that you stress that jerky needs to get to a temp. of 160. Here's my immediate problem (I'm sure there will be others): I turned on my Nesco FD75 for the first time today to test it and make sure it comes up to temperature. The unit was empty, and I set it at the highest setting (160). I let it run for half an hour to bring everything up to temperature. I inserted an instant read thermometer deep into the air outlet at the bottom. The highest internal air reading I could get was 140 degrees. I double checked it with a second thermometer and got the same reading. Then I inserted the probes underneath the top of the unit and held the top down. The readings on both thermometers barely got up to 150 degrees after about 5 min., but wouldn't go any higher than that. Should I assume that my unit is defective, or is there another temp. testing method that is more accurate? I really don't want to be bothered using an oven to preheat my jerky. Any advice you can give me would be greatly appreciated. Thanks,
Will
I would either use a hand held temperature gun to see what the temperature is inside, or take a VERY thin piece of meat (1/8") and fold a thermometer inside it. So fold it in half and put the thermometer inside it. Then place that in the dehydrator for 2-3 hours and see if the inside reaches 160F. I think it is hard to just get a temperature from a probe with just air blowing on it. If it doesn't bring the temperature up, contact Nesco.
Cary
Will! I’m a jerky newbie! Lots of great info here and I thank you for your time and expertise.
I’m just now making my first batch of beef jerky. I saw something about reaching a temp of 160 degrees, but when I eat a medium-rare steak, it’s at 135-140 degrees. I guess I still risk the chance of food poisoning?
Will
No problem Cary! Bacteria normally don't penetrate too deep into whole meat and are mainly closer to the surface of meat. When you get a thick steak, the outside and first little bit is cooked to a very high temperature and even though the inside has not reached 160F, it's safe because it has a low chance of having had contact with bacteria. With jerky, you are handling and slicing that meat very thin giving bacteria the opportunity to survive near the middle of the jerky slice.
Sunny
New to the Jerky game! Do I have to use a cure?
Will
Nope, you don't have to use cure. Check out my FAQ page for more information on it.
Terry
Hi Will, Great website. My friend's great grandparents are moving into retirement home and cleaning out home. I "salvaged" a brand new Sweda Food Dehydrator still sealed in box. It was purchased in 1994 "As Seen On TV" according to invoice attached to box. Would love to try it but has no thermostat so will use advice in above posts. It dosent have any fan circulator that I can see just a heating element in the bottom. Unfortunately the instruction/recipe booklet is only 3 very vague pages. Do you think it's still oak to use? Thanks Will.
Will
I am not sure that I have heard of a dehydrator without a fan, that's kinda the whole point of the dehydrator. Ha. Ultimately it should work like your oven with the only difference is you not knowing what the temperature is (which sucks). I would pre-heat the meat in the oven and then transfer it to the Sweda. Let me know how the dehydrator turns out working for you!
Thomas Moore
Will, My wife buys Jerky for our dogs ,Very expensive .
Have you ever made jerky for dogs as snaks ?
Will
I haven't tried making dog treats Thomas. I would the best treat would be ground jerky with little ingredients. I can't imagine dogs being too picky about the flavor of their meat treats!
Kali
I am making my first batch of jerky now....I'm curious as I have read through most of the comments and haven't seen it mentioned... Pounding out the meat (after marinating and patting dry) for thinner jerky...is this advisable? If so..how long should it be dehydrated? Will it still pass the bend test? Being that it's so thin I'm a little worried about even being able to check the "internal temperature".
Will
Hey Kali! I normally pound out the jerky after slicing and BEFORE marinating. You could pound it out after, but it might make a little mess if your jerky is really wet. Ha. It will help make the jerky more tender as well. If it is to thin to put a thermometer in the middle of the meat, wrap the thinnest piece around the thermometer.
mohammad rahnamafar
hello
i want to produce beef jerky in my country
could you please answer this questions 1.what kind of preservative i should use in my product to have 1 year shelf life
2.when i dehydrate meat to 10% moisture it goes very hard what should i do to have soft jerky(elastic somehow like the other jerkies in stores?
Will
The answer to question #1 is prague powder #1. If you find out the answer to #2, let me know! I am still trying to figure that one out...
Joni
I have a dehydrator that does not have a thermostat can I still make jerky?
Will
You can, but I would use a thermometer and wrap a piece of meat around it to see what temperature your dehydrator is heating your jerky to. If it does not reach 160F, pre-heating in the oven is a good way to kill bacteria, then move to the dehydrator.
Jack Oliver
I’ve been looking for a recipe like this! Since going high-protein my dehydrator is humming all the time! I’ve been wanting to try my own version of jerky, but always thought you needed to add a ‘cure’ to the meat.
Will
Nope, cure is not necessary. Keep pumping out that jerky!
T J
Just ordered the excalibur! I can't wait, I've been trying to make jerky on my masterbuilt but I was having so much trouble to get the jerky just right without overdrying it. thanks for all the awesome recipes I think rig hand is my favorite so far!
Will
No problem! Rig hand is definitely a great one!
Justin
Hello, I have an old RONCO Dehydrator. There are no temp settings so I have no idea what the temp is. I tried making jerky for the first time a few days ago. I used a digital thermometer to check on the jerky, the jerky never rose above the 100 deg mark.
I left it in for 11 hrs. The cut was around a 1/4". The jerky tastes great, but I dont want to dehydrate longer than I have to on the next run.
Will
I have not used that dehydrator and would be cautious of using a dehydrator that does not heat the meat to 160F. If it doesn't get the meat up to that temp in a couple hours, it's not going to. I would invest in a different dehydrator or use your oven.
Gary
One Day at a Second Hand Store, My Wife Called me over and wanted to look at Excalibur Dehydrator 9 trays. it was never used I paid 20.00 dollars for it. and i used it OMG it worked amazing on Drying out Jerky.
Will
That is an Extremely good price on an Excalibur! Nice find there Gary.
Jerkymymeat
I'm a tried dehydrating Watermelon with my jerkey... awesomeness !I live being a jerkey head,I'm so addicted to it I have 150 dehydrator and 50 Hydrator (I like to rehydrate my jerkey before I eat it ..I'm not a Savage.
Will
That's interesting. I have never re-hydrated my jerky before eating. Might have to try that!
Mike H
Hi Will,
Would you be able display some proof of the nesco FD 75 heating to 160 degrees? I have had 3 different ones now and have monitored temp with a digital probe.. I have been unable to reach a temp over 160f in any of the 3 units. Also, if the meat is in, I noticed its considerably harder to get it up to 150. Have you tried to check the ambient temperature with the meat in?
Will
Sure thing Mike. You can check my page where I tested several dehydrators. The Nesco is one of the dehydrators that I tested.
ZPianga
Using elk burger. Having issues keeping the heat flavor in. Using soy, wasabi, ginger, onion, garlic, brown sugar. Want sweet & spicy jerky. Considering a light glaze of honey, then shaking red chili flakes onto it. Ur thoughts please.
Will
My 2 cents... Honey would definitely give it some sweet flavor. I wouldn't use too much though, the honey tends to give the jerky a sticky feel. Red pepper flakes will stick to it well. When I want a lot of heat, using real peppers in the marinade blended in a blender gives a real good heat flavor! Habaneros are one of my favorites to use for the heat and they are easy to find in grocery stores.
Jamie Rask
I purchased the Excalibur 3948CDB 9-Tray Electric Food Dehydrator Clear Door. Everything I've read about this dehydrator says it's the best one out there now and says the trays do not need to be rotated because the fan is in the rear making the drying evenly across all trays. What's your thought? I also want to purchase a food processor to slice my garden veggies, fruits and jerky meat. Cuisanart seems to be the best one I've seen the 14 cup model. Purchasing an apple and potato peeler and we'll as a French bean slicer. I have a vacuum packer so everything should stay good for quite awhile. Any thoughts? I am reading a dehydrating book written by a lady that's been doing this a long time. She runs 3 dehydrators to stock up her pantry shelf. I have a garden with a ton of tomatoes, green an yellow beans, zucinni and cucumbers so want to get it all packed away.
Will
Hey Jamie! I like to rotate the trays about half way through. It's not necessary, but have found that I get a more even dry product when I do rotate them. I don't dehydrate any vegetables so can't be of a big help there. I do use a jerky slicer that I really like. But this one would only be good for slicing meat, not vegetables. Hope you enjoy your dehydrator and try some of the recipes I have on the site.
Ryan
Would you be able to make up a mock jerky recipe of Jack Links Peppered jerky? Thanks
Will
I would have to go buy some and check out what they have listed in their ingredients. A lot of times you can come close to making your favorite jerky brand by checking out the ingredients on the back. I have not tried to make JL Peppered jerky, but I do have a good peppered jerky recipe on the site...
Debra Bennett
I am going to try this recipe this upcoming weekend, june 16th 2018, Thank You for the detailed recipe! Do you know how to make candied salmon in a smoker?
Will
I have never done it, but would assume it's just like making jerky with a recipe that has syrup, honey, sugar.... Smoking it will be a lot like making beef jerky in a smoker. Let me know how your jerky turns out!
Jerkymymeat
Just give the fish a sucker or some chocolate...
Edward Vanderhider
I’ve been making my beef jerky for years now, I used to cut my own meat and even bought a sliver. A huge trick I’ve learned is that if you go to Mexican meat markets you can buy a cut of meat called milanessa. It’s super thin cut and different markets use different cuts, I always look for any with solid red meat, less fat as fat wont dehydrate. It’s such a time saver and on average sells for between 4-6 dollars per pound:)
Mike
With all the talk about getting the meat to 160, why do they make dehydrators with a top temp of 158, like mine. Seems pretty stupid to have to cook in the oven and then dehydrate it. Why couldn't everyone make them to cook at 170 or close to that !!
Will
It's crazy.... I am not sure what dehydrator you have, but a lot of time the number doesn't reflect the temperature the dehydrator pumps air out at, but what temperature it will get the meat to. I would use a thermometer and check to see if it actually gets the meat to 160F. It just might. I have tested several dehydrators and some don't...
Eddie Hanks
Should I not use liquid when mixing up ground beef for formed jerky?
Will
You can use liquid. I normally use about 1/4 cup or so depending on the recipe. If you use too much though it can make the jerky not form well.
Gary
Hi, Will. Thank for such a great, comprehensive website. I've pointed lots of folks to you.
Will, I've looked quite a bit but without much success - I would like to make a thicker, softer beef jerky, similar to Krave brand. Is that something we can do at home and if so, would you be able to point me in the right direction on how to make it? I keep experimenting but haven't got the knack yet! 🙂
Thanks again, to you and all of your readers - I've learned a lot coming here.
Will
Thanks for coming to the site and letting other know about it! You have a question that I have been trying to answer for a while. When I figure out how they make their jerky so soft, I will definitely put it on the site. I have been testing for a long time with different methods and cuts of meat trying to figure it out. I read an article a while back where the owner of Krave mentioned they "cook the jerky twice". That is the only piece of information that I have been able to find to try and help figure it out. If you do end up cracking the code to soft jerky, please let me know!
Klaus Arsenijevic
Hi Will,
Jus got a Nesco Profesional cpl weeks ago.I bought it for jerky,basically.I have never made jerky n i have 2 questions. With all that i have read on the process of getting the meet to a temp.of 160 degrees,how can u be confident that any temp.setting is actually 160,since that is the max temp. Of my unit and a lotta others,how can u trust any dehydrator to actually give you that 160 degree temp.? Yes take a temp reading,but how can you gamble with your life,(worst case scenario),and assume it will allways be that max allowable temp of that dehydrator,for the life of the unit.heating units and other parts degrade,over time,get defective,etc and there is no margin of error for any malfunction specially when 160 is the max setting.
Question 2...if i decide to preheat the meat before i dehydrate,i was wondering if i could use an air fryer to get the meat to 160 degrees? It seems to be quicker and more efficiant than the oven method but might take a little longer in that i would have to make more batches since it doesnt hold as much. I have looked at a lotta sites and have not found any info on using an air fryer.
The best,easier way would be to jus pop it in the dehydrator,then pop it out when done,and i so want to do that,but,i jus don't trust the heating temps.and reliability of these dehydrators.
Thank you
Will
You are right that dehydrators could degrade over time and not heat the meat to 160F. I would check every once in a while to make sure that the unit is still heating to the required temperature. I have not used an air fryer before, but as long as it heats the meat to 160F, it should do the trick. I am interested in how it turns out. If you use your air fryer, come back and let me know!
Newbie
Hi Will,
As this is my first time, I'm sure I did something 'wrong', but please point me where to go.
Cut strips - Check - ( London Broil, about 1/4 )
Marinade - Check - ( Thick, 24 hours )
Place in oven - 300 for 10 min
Now process fell apart. I measured temp buy folding strip in half, with my prob between the folds. It only went to 120
Back in oven, 10 more min - measure - only 130
Back in oven, 10 more min, 130
Raised oven to 350, 10 more min, 130
Back in oven, 10 min, still 130....
At this point I inserted a different thermometer - still 130
So now strips are almost chard, taste like much too well done steak (burnt).
Didn't get to dehydrator yet.
What did I miss ?
Thanks for any guidance.
Will
That is a lot of oven time, no wonder it was chard! I am not sure why your thermometer wasn't getting up to temp. Make sure the strips are directly on the oven tray, that will help heat them faster than if they are on a cooling rack on top of a tray. I have never had to keep it in for longer than about 10 minutes. Just put it in for 10 minutes next time, it should be good to go!
Don Brokate
Hi Will,
Does outside temp. affect the drying process? I would like to try my first batch of deer sticks in my unheated garage. My buddy found a Oster dehydrator at a garage sale, but it has no temperature setting.
Will
I would first fire up the dehydrator in your garage and put a plastic bowl with water on one of the trays. Put a thermometer in the bowl of water and see how long, if at all, it takes the water to reach 160F. If it does not reach 160F, make sure to pre-heat your meat to kill any potential bacteria. I have never used my dehydrators in a cold environment, just my kitchen, so I am not sure how the cold garage will affect the inside of the dehydrator. Let me know how the deer sticks turns out!
Eric
Will,
I have tried making Jerky with a dehydrator twice now and both of my batches did not turn out well. The flavors are great, but I cannot get the texture right. The first batch that I made did not seem dry to me at all, so I keep in the dehydrator for about 12 hours. The meat was not brittle at all, rather it was impossible to rip even with your teeth. Do you think that this was caused by dehydrating too long? I kept reading that it should get brittle and crumble if it was too dry, so I just left it in. I just made my second batch and only put it in for 4 hours. I made sure that my meat was not sliced too thick as well. This batch is somewhat better, but still seems very difficult to rip a piece off. Do you think it was possible that this one was not dehydrated long enough? Can I put it back in the dehydrator and check it again. I am sure that my pieces were not bigger than 1/4", but feel that they need to be thinner. Please help!!!!!
Will
Most of my jerky that is sliced 1/4" takes about 4-5 hours to dry, so it sounds like your problem isn't time related. It sounds like you might need to slice it against the grain. You didn't mention how you were slicing the meat, but if you go against the grain it will be easier to chew. If you want it even more tender, use a meat mallet to pound the meat before you marinate it. Extra salt will also help get it a little more tender. Check out my page on Slicing Jerky for tips. Hope that helps Eric!
John
Hi Will, I entered info on a problem I have but I'm not sure it made it as it is not in this list. I apologize if this is a repeat.
A friend dropped off about 8 lbs ($49 dollars) of Tenderloin for me to make beef jerky with. I hesitate to open up the sealed plastic wrap until I know if it is lean enough. Usually the better cuts of meat are marbled with fat and not suitable for jerky making.
I'm thinking of just giving this back to him so he can enjoy steaks on the barbeque and bring me 4 lbs of Eye of Round. Can you give me your thoughts? Thank you!
Will
I wrote back yesterday, not sure what happened. This is what I responded "Some tenderloin is not fatty at all inside, so I’m not sure if the tenderloin you have will be fatty or not. You can make jerky out of it though. If it does have a good amount of marbling, just keep the jerky in the fridge and eat it within a week. Normally jerky is made out of less expensive cuts, but tenderloin should taste great!"
Michael
Hello Will. I have read through your entire blog and did not want to repeat a question, but I did not see anything like mine. So here goes...I started a batch of jerky tonight. I planned on starting it earlier, but got home later than expected. I thought about just waiting until tomorrow, but then it would have been in the marinade for over 24 hours (I used your Korean recipe and wasn't sure if going over 24 hours would ruin the meat). It has been in my Nesco 75 at 160º for three hours, but I am exhausted and want to go to bed. Could I turn it off, go to bed, and then just start it up in the morning to finish it? I'm not going to do so, as I wouldn't want to taint the batch, but for future situations I wonder if this would be ok? I know that it's only another hour (in theory), but what if it was to take 5+hours?
Will
It's best to have it in the oven or dehydrator until it's done. You definitely don't want to stop it before it has reached 160F internal temp and let it sit at room temperature, bacteria would have a field day in the meat. If you must stop in the middle of dehydrating; put the jerky in a container and store in the fridge until you can finish dehydrating. The easiest thing to do is buy a timer that will stop your dehydrator. I have this one from amazon and it works just fine. This way you can set it and go to bed...
Christine
Hi Will. I just found your site. I am new to jerky making. My first batch, I used london broil with the Nesco jerky seasoning that came with my dehydrator. I mistakingly followed the company's recommendation on drying time and over dried the jerky way too much. It was edible though. I found that I do not like the Nesco jerky seasoning, so I can't wait to try some of your recipes.
I am wondering if you have ever made jerky from lamb? If so, I'd love some tips. I raise my own lamb and would love to add another way to enjoy it. Thank you!
Will
I have not used lamb before when making jerky so don't have any tips. I would assume it would be the same as making beef jerky... Not sure how that would turn out, buy would love to know! Try making some and let me know how it tastes!
NMR
Hi! I just made my first batch of jerky using my new Nesco Snackmaster Pro. I was wondering how long *could* you marinate beef for if you wanted? Like past the 24 hours. I know I over-dehydrated my jerky which might account for some of the lack of flavor, but I'm wondering if more marinating would have helped (I did about 18-20 hours).
Thanks!
Will
Normally 24hrs is plenty of time to get the full flavor. You can definitely marinade it longer though, 48 or even 72hrs.
Lee K.
Hi Will, I've learned a lot in the past couple of weeks reading through your site. I have 2 questions for you.
- First, are there any issues I should be aware of if I use commercial marinades instead of the seasoning and cure? I know mine will taste better when I get going but I found a couple of tasty looking marinades and want to try them to get my feet wet.
- Second, in your post about the Dale's Steak Seasoning, you mention running your dehydrator at 160 for 3 hours then down to 145 for another hour. What is the reasoning for turning it down for the last hour?
Thanks for your time!
Will
Hey Lee, good to see you have been searching through the site. There is nothing wrong with using commercial marinades when making jerky, I use them all the time. Try to use marinades that aren't too thick, the thicker it is the less it penetrates the meat and flavors it. BBQ sauces can be too thick and you won't get the flavor to really soak into the meat. To answer your second question; I keep the dehydrator up at 160F to make sure the meat reaches that internal temperature. The reason I turn it down is because I have already achieved an internal temp of 160F and don't need to keep cooking it, I only want to keep drying it until it's finished. When only drying for 4 hours, turning it down doesn't make too much of a difference. If you are smoking jerky for 10 hours, the prolonged high temperature can affect the texture of the meat.
James
Thanks Will for this site- so much info!
I got a clone copy of Excalibur. When I crank up the temp dial goes to the top, the temperature at the front (lowest tray) goes up to 160f (163 to be exact) but then it drops down to 144f and then goes up to 163 again.
I have tried the sausage test - got it to 147 in 90 min, but would not go any higher. Maybe I have used the wrong sausage =) Can someone measure the temp inside their dehydrator as it works - do they all fluctuate?
I tried making jerky by oven method, but I dont really like it - tastes like fried meat that was done passed it well done stage =)
Will
I believe it fluctuates because the heater in the dehydrator is turning on and off. I did see a 15F degree difference between the front of the tray and the back of the tray. That's why I rotate my trays half way through the drying process. I wish all the dehydrators had a 180F setting that would get the meat to 160F fast and then make it able to turn it down....
Nanette Jackson
Hey Will,
I am going to try this weekend. Thank you for all of your useful information. I really appreciate it. I am going to try several different cuts of meat. I will let you know how it goes. Thanks for being here.
Will
No problem Nanette. Hope your jerky turns out great!
Mike Meyer
Hi!,
My name is Mike and I by accident ran on this website which I found interesting. I use to be an Engineer at American Harvest, so I think I know something about them and also the Jet-stream ovens. I also have done consulting work for Metalware (Nesco) but not much happened there because of too much competition from China. Anyway, in the 90's we compared all the competition in dehydrators, and hands down American Harvest was the best. We put them all through a lot of tests, but the idea of converging the air across each try was superior to any others. Not perfect! But a lot better. When I use my American Harvest Dehydrator I usually stop at the 1/2 way point in drying and swap the top half stack of trays with the bottom and everything seams to turn out equal between what drying. When I do jerky, i just roll everything in paper towels mid way and at the end to eliminate as much grease. Its the grease that prevents the jerky from lasting very long the most. Well, hopefully there may be some useful info from me.
Mike
Will
Thanks for the info Mike! Did Nesco buy out American Harvest?
Thomas
Hi Will, I just found an older model American Harvest Snackmaster dehydrator in my garage, but the dial only turns to 145. I did use the Prague Powder #1. Should I put the jerky (I'm doing kikkomam Teriyaki recipe and the Montana Mountain) in the oven first or is the cute enough? Thank you
Will
I would throw it in the oven first. I always like to be extra safe and bring the internal temp to 160F.
patrick
in order to check the jerky as it processes you have to turn off the unit unstack the trays and then restack and turn back on for a nesco round dehydrator ? maybe I should have shopped for slide out tray model ?
Will
That is correct Patrick. The top of the dehydrator is the fan and heating unit. I have used this dehydrator for years and never found it annoying or inconvenient to check my jerky. If this is something that would bother you, then the Excalibur would be your best bet. You can leave the unit on and pull one tray out at a time when checking the jerky.
Tim Kenney
I have an Excalibur dehydrator and have made a couple batches which have turned out good.
I’ve been using the extra non stick sheets you can buy to put on your dehydrator trays but I noticed that I have to turn the meet because it doesn’t dry completely during the process. Am I doing something wrong or should I ditch those sheets and just use the lattice trays that come with the dehydrator? The non stick sheets make it a little beater to process but I seem to be sacrificing drying efficiency. Thoughts?
Will
I have not used the non-stick sheets you are talking about. If it is affecting the drying of the jerky, I would stick with the ones provided with the unit. I have never had a problem with them. You can always spray them with PAM spray before adding the jerky strips to make clean up a little easier....
Patrick Mullen Jr.
Hello,
Love the site ! excited to try that horseradish recipe. What advice to you have for poultry? I just got a nesco dehydrator today for my birthday the temp goes to 160.
Thanks,
patrick
Will
Thanks Patrick! When it comes to making poultry, I always pre-heat in the oven and use curing salt. I like being extra careful. Check out my latest recipe with turkey to see how I made it. Happy Birthday!!!!
Peter
In respect of the using of dehydrator, is the jerky safe to eat as the tempeture is 70 celsius degree, can it kill the pathogens (I do not use salt to cure the meat)?
Will
If the dehydrator heats the meat to 70 degrees Celsius, the jerky will be safe to eat.
Robert heaton
Hi there!
Quick question about tempa and curing salts/powder. Ive read the importance of temp of the meat reaching 160, and that if you reach that temp it is not necessary for curing salts. My dehydrator is a. Digital cabelas unit that does get to 160 but not any higher it does display that internal temp but it seems to vary alot. I can watch it get up to 160 161 than the heater kicks off and the temp rapidly drops to 155 150 than kicks back on. Is there a certain length of time the meat has to be at 160? I have also read that you don't want the 160 temp to late in the process also. Is there a time for that? So say to be on the safe side of things i use a curing salt which brand do you think is best. I bought a cabelas jerky season/cure pack to try out making my first few batches and it says to use the whole packet regardless even tho it's for 5 pounds of meat. Not that the jerky is overly salty i wonder if it it's because i used the whole packet on 2 pounds of meat that it does have a Saltier taste.
I want to make my own marinades and try not to use cure salts but i dont know if it's worth not due to the potential health issues. Curious on your thoughts.
Will
Raising the internal temperature of the jerky to 160F at the beginning of drying is important and is more effective in killing bacteria than heating it at the end of the drying process. I have not used the Cabelas dehydrator, but the Nesco and Excalibur I have heat 1/4" jerky to 160F in about 2.5hrs. At 2.5hrs the jerky is not dry (You want to heat it to 160F before it is dry). There really isn't an exact time to heat it by, just before it has dried. When using an oven or smoker, I turn the temperature up at the very beginning since I have more control over the temperature unlike a dehydrator. Once it reaches the 160F you can lower the temperature, it doesn't need to remain at that temperature for any amount of time. When it comes to curing salt, I use Hoosier Hill Prague Powder #1 which I buy from amazon. It is hard to find curing salt in local stores. I am surprised that the Cabelas packet said to use the whole packet even if you are NOT using 5lbs of meat. Curing salt is very safe when the correct amount is used. I would have only used 1/2 of the curing salt package and not the whole amount. Using too much will make your jerky more salty but could also be unsafe. For the Hoosier Hill Prague Powder, use 1tsp per 5lbs of meat. If you don't want to use cure it is perfectly healthy as long as you heat the jerky to an internal temperature of 160F. Hope that isn't too much info! ha. Cruise through the blog, I have a lot of good information throughout. Thanks for stopping by Robert!
Víctor Hugo Solís Valladares
Hola Will. Te escribo desde Sonora, México. Aquí la carne seca se llama machaca. Tengo un desecador nesco. Voy a intentar hacer tu receta. Gracias por compartir tu receta. Saludos.
Will
De Nada! Gracias por mirar mi sitio.
Anthony
Great video! Thanks. I'm on my 6th batch in last few months with my nesco dehydrator but always had a difficult time telling if my jerky was finished. My 2 year old enjoys the jerky too so it was always important to me that the jerky was all the way done. Up until this last batch I kinda just over dried the meat just to make sure. Not anymore. I did have one question. Do you know if curing salt necessary or will regular ol' Morton salt do the job? Thanks again!
Will
Thanks! I'm glad your 2 year old is enjoying some jerky! You can use Morton tender quick, but it requires more than the Prague powder, so be careful with the saltiness. It will add a lot of salt flavor.
Anthony Zelina
great tips here on your site, i just picked up a excaliber 3900 for 5 bucks at the goowill pound store, in excelent condition with 9 non stick mats!! so i am moving up from my ronco or whatever it was... you have a new follower!
Will
Nice! That's a hell of a deal. Glad to have you man.
Igor
Hi Will.
In your video How to make a jerky using Nesco dehydrator you mentioned that you ran 2.5 hours for 160 and then about 2.5 hours for 140. But everywhere else it mentioned to run for 4-5 hours with 160. I am just a little bit confused which is one is correct?
Thank You,
Igor.
Will
It's up to you. I run the dehydrator at 160F for at least 2.5 hours to get the meat to an internal temperature of 160F. You can either keep it at 160F or lower to as low as 145F. Just keep the temperature above 145F when finishing the jerky off. So sometimes if I am leaving my house, I will set it at 160F and leave it going for 4 hours. If I am home, I might turn it down to 145F. The 15 degrees doesn't seem to make too much of a difference when finishing the jerky. Hope that helps!
Chris Gagne
Found this site while researching how to make Jerky. It is now bookmarked for future reference! I picked up two Dehydrators recently to start with. One is the 10 Tray Deluxe model from Cabelas and the other is a 9 tray Nesco. I think the Nesco is the same as yours but with 4 extra trays added to it. Using the Cabelas unit for the first batch to see how this goes. More then likely will leave the meat in it for closer to 5 hours this first time to play it safe. I am using a seasoning with nitrates in it which from what i am reading is a curing type seasoning correct? Which may allow me to skip the oven step if i am right on that?
Will
That is a curing mix, but surprised it has nitrates and not nitrites. Normally prague powder #1 (nitrites) is used for jerky while prague powder #2 (nitrates) is used for a longer curing time such as sausage making. If it came in a store bought mix, i'm sure its good to go. It is always a good idea to heat the meat to 160F, even with curing salt. I have tested my Nesco to make sure it heats my jerky to 160F. Since it does I skip the pre heat step when I use curing salt. It's always a good idea to check your dehydrator though....
Aaron meyer
Will is great I have just started my first jerky ever and I have learned so much from just reading I am really glad someone has taken the time and compassion to help us all out thanks man
Will
No problem! Welcome to the world of jerky Aaron.
Curt
I'm going to order some jerky seasoning from Nesco. They come with a packet of white curing salt, but I bought some pink curing salt earlier and was wondering if there is a difference, and if so, which would you recommend?
Will
I am not 100% positive that the Nesco curing salt is prague powder #1, but it is probably the same. Curing salt is white, but if it's sold online and in the USA it is required to be dyed pink so it is not mistaken for table salt.
Mary
Does soy sauce in the marinade and vinegar act as curing agents? Just wondering, since I skipped the part of curing in the oven first. Can you just use a digital meat thermometer to assess the 160 temp?
Thanks,
Mary K.
Will
Hey Mary! The salt in the soy sauce will help to preserve, but it doesn't cure the meat. I use this digital meat thermometer to check to see if the jerky reaches 160F. If you are going to skip the oven pre-heating method, make sure your dehydrator gets the meat to 160F.
Duncan Silvert-Noftle
Yo, I live in Austin too. Which butcher shops do you like? I just got a 5 tray excalibur and want to start doing a lot of jerky experimenting. Would love to chat with you sometime. Thanks buddy
Will
Nice man. I actually just moved about a week ago to Denver! I guess I need to change that on my Bio. Ha. I used to get my meat at my local HEB. They had great quality and really good prices. I hope you find a lot of good info on the site. Let me know how your jerky turns out!!!
Curt
Just made my first batch using the Nesco dehydrator. It was small batch, using only three trays. Started at 160 degrees and checked it about 3hours later. The jerky looked done (checking with the bend method) and tasted great. After storing in a zip lock bag in the refrigerator, after about 3 days I noticed there was some moisture. Should I have dried it longer, and is it still safe to eat?
Will
Sometimes your jerky will not be completely moisture free. I would make sure that before you store your jerky in a ziplock bag, you make sure it cools outside the bag for several hours. If you are keeping in a fridge, you might use a paper bag instead of a ziplock bag. This is what most local jerky makers package their jerky in when sold at rodeos or farm stands. The paper bag allows for the jerky to dry out a little more; you can then store in a ziplock bag after a couple days in the paper bag. If you don't want to use the paper bag method, pop it back in the dehydrator and really dry that jerky. As long as you don't see any mold on the jerky, it is still safe to eat.
Russell
Thank you!! NEEDED this write up mainly for storage tips! I've been doing some slightly "unusual jerkies" (venison and salmon) in my "Raw Rutes dehydrator"and have been trying to figure out how long jerky can be stored!
Will
Glad I could help. Also check out of my page on Storing Jerky.
Kelsey
How can I find out how hot my dehydrator is getting? It's old no controls and round! Bought from a yard sale
Will
Hey Kelsey! You want to make sure that your dehydrator is heating your jerky to 160F. One way to do this is slice a very thin piece of meat (1/8" or so), put a thermometer in the middle, and fold the meat over so the thermometer in the middle of the folded piece. Then put it in the dehydrator on high and see if it gets the meat to 160F and keep track of how long it takes. This way you know how long you have to heat it at 160F when making future jerky. Another way is a shallow dish full of water with a thermometer in it. Hope that helps!
OldPhart OutIn TheDesert
I've gotten huge success with my "OldPhart's Sriracha Jerky".
Use about three ounces of Sriracha per pound, mix pieces throughout, and let stand overnight in the 'fridge. (What ever you do, do NOT mix bare handed...your skin will 'burn' for three hours!)
I use London Broil, butcher cut into strips 1/4" thick. I then cross cut into pieces about an inch prior to putting into the Sriracha.
If you like a spicy jerky, this is awesome.
Mike Draper
Will I have made jerky for some years now and recently made some and the flavor is not as strong as i like. i usually soak in marinade for 3 days and this time added some meat to the top of what had been in it for 2 days, So it did not get to soak but one day and it's flavor is lacking so was wondering if i could rehydrate for a day or so and then dehydrate again to ensure better flavor?
Will
Hey Mike! I wish I could help more, but have never tried to rehydrate jerky. I am surprised that it is lacking flavor. I normally only marinate my jerky for about 24hrs and it has a lot of flavor. Maybe it's the recipe you have that requires longer marinating time. Sorry I couldn't help; but if you do decide to rehydrate and marinate longer, let me know how it turns out!
Pete Norris
Will;
I bought a dehydrator off from eBay. It has got digital controls. The lowest temperature is 104 degrees. It then can be increased in 9 degree increments.
104 (starting)
113
122
131
140
149
158 (highest)
It just arrived yesterday. I have not used it yet. Will the temperature setting of 158 degrees work for beef jerky?
Thanks.
Will
You want to heat jerky to an internal temperature of 160F. If the dehydrator only goes to 158F, it won't get the jerky to where it needs to be. It's best to pre-heat it in the oven for 10 minutes at 300F and then put in the dehydrator. That will ensure the jerky is safe.
Goody
Hey there you bunch of jerkys,
I'm new to this site and really liked reading all your postings. Just purchased a dehydrator and made my first batch of venison jerky last night. I was somewhat happy with the results. My one concern was the amount of taste of salt from the curing ingredient. Would like to try to cut that ingredient in half the next batch I make. Also maby pre heat meat in the oven prior to avoid bacteria. Would that be ok to do? Also looking to score some good recipes on this site soon? Thanks
Will
Normally the curing salt doesn't have that much of a salty taste since you are only using about a 1/4 tsp per lb. Cutting the curing ingredient in half would limit its effectiveness. If you are going to cut the curing salt in half, it would be a good idea to heat the jerky in the oven to 160F first. I have found that 10 minutes at 300F does the trick. I have a lot of recipes on the site, you can check them out on my Recipe Page. Hope you find some good ones that excite your taste buds!
Kat
Folks always ask about how long they can store jerky. A friend bought those little desiccant packets to store with his, and said it adds months to the shelf life. They are super cheap on Amazon. My first batch of teriyaki II is curing in the oven!
Phillip
Good page! Years ago I learned a thing or two. The best jerky that I have made requires finding an honest BUTCHER shop. I buy round tip roast, cap off. I tell the butcher that I am making jerky and ask for the best "trim" that he can give me and then to slice the roast a bit less than 1/4 inch thick. He does all the hard work! Marinate. Dehydrate. Yum!
Will
Yep, you can't make good jerky without good meat. They are normally cheap cuts, but the best quality is important!
Mike
First off, I love your page. All the discussions and recipes are awesome for a jerky noob like me. I started looking at making jerky to give me something healthy to snack on and every search I do online leads me back here. So I went out and bought a Nesco dehydrator and have my first trial batch marinating now. I'm confused by a couple things I see online and you seem to be just the guy to ask
1. Is there a difference in prep between a rub and a marinade? I'm assuming the drying process is shorter, but beyond that what are the differences in prep and in the end product? Are you aware of anything I can use as a marinade base to add to a rub without changing the flavor (to help the rub penetrate the meat)?
2. I'm confused by all this talk of "cure". You mention cure salt repeatedly, is this different than regular salt? I use sea salt as much as possible. I've seen references that adding a "cure" isn't necessary, but you seem to have all of your stuff together and you also seem to use it. What is "cure" made out of? My Nesco came with several packets of it, but one of the things I'm trying to get away from is additives and preservatives...
Keep up the awesome site, it's easily one of the most informative pages on the subject ANYWHERE.
Will
Thanks! I use mostly marinades and not rubs. I just feel like the meat is better coated and is better flavored with the wet marinade. I add water to dry rubs to help it stick to the meat better. The water will not change the flavor. I use about 1/4 cup per 1lb of meat. When it comes to cure, curing salt is VERY different from table salt. Prague powder #1 (the curing salt I use) contains 6.25% sodium nitrite and 93.75% sodium chloride as per FDA and USDA regulations. It will be pink in color to distinguish it from regular table salt. When using the correct amount of cure, it is very safe. It will help prevent bacteria growth in your jerky. If you decide not to use curing salt, make sure that you heat your jerky to 160F at the beginning of the drying process to kill any potential bacteria. Hope that helps!
Jimmy
How do you know when the meat reaches 160* . Will a regular digital meat thermometer work? Just stick it in the meat or the inside temp or just check the temperature in the oven. I have a newco 06300. Can't wait to get started!
Will
Pierce a larger slice of meat with the digital thermometer probe, or fold a piece of jerky in half with the thermometer probe in the middle. This is the best way to check the temperature.
A salo
Is jerky nice without any marinate, as in just plain beef?
Will
Just plain beef would be kinda bland. I would recommend using some type of marinade or dry rub, even if it's just a couple spices...
Tim
Hey will. I have the 9 tray Excalibur digital thermostat. My jerky is about 1/4 inch thick and I usually set it for 72c because it doesn't read in f for some reason and cook for 6 hours. Is this to long? I'm trying to eventually get in the business to sell my own jerky. Any tips you can throw my way? I would appreciate it. Website is awesome. Thanks for everything.
Tim
Tim
Oh and by the way I have the meat department at my local grocery store (souther California) cut the meat for me. So the pieces look more like steaks but 1/4 thick, maybe less. Thanks again.
Tim
Will
It really depends on the meat and your individual dehydrator on how long it will take. 72C is 160F, which is what I begin drying my jerky at. My Excalibur takes normally around 4-5 hours to dry the jerky to my liking. I don't often have to dry it for 6 hours, but every machine is a little different. All the tips I have are on this site, so search away and I hope it really helps. Good luck on the jerky business!
Bill
My wife and kids love jerky. I use flank steak from Costco and put it in a Nesco dehydrator. However, I never heat it up to 160. I use it on its lowest temperature setting (90 degrees) outside in winter here in pretty dry Colorado. If it's 30 degrees outside, I guess it gets to about 50 degrees (I would expect that they assume that the dehydrator is used indoors at 70 degrees, and it doesn't have a real thermostat). We have never gotten sick eating meat this way. I subscribe to the Alton Brown philosophy that jerky is dried meat, not cooked meat. However I think he is crazy with his weird prescription for a huge box fan and lots of disposable furnace filters. Just do it the way I described above and you'll be fine. I use curing salt #1 for other kinds of prepared meat, but not for jerky.
Will
Well I am glad to hear that you or your family has not gotten sick from the jerky, but I would not go as far as to say that because of that everyone is okay to use your method. I have seen Alton Brown's drying method and do not agree with it. E Coli outbreaks have happened from non heated jerky and that is why the USDA highly recommends heating jerky to 160F. It only takes one time for bacteria to grow and possibly make a loved one sick. It is not worth the risk in my opinion...
RealityCheck
Compare the risks to eating raw oysters or sushi. If you marinate this in an acidic environment the risk is very minimal. Even if you just put the raw meat straight on the dehydrator with no seasoning, salt, ect it would be approaching zero. I eat raw fish 2-3 times a week. I accept there is some risk in both but it is very minimal.
We made jerky growing up a lot in those cheap round dehydrators. I had my stomach stapled in July and I've been living off beef jerky and raw fish since, so I figured I'd start making my own jerky and wanted to take note of other processes to do it. I can't imagine cooking the meat before I dry it, kind of defeats the purpose.
Will
It just depends on how comfortable you are with risking you or your families health. There have been cases of numerous people getting sick from homemade beef jerky that contained E. Coli. I don't want any part of that and recommend heating the jerky at the beginning of the drying process to kill potential bacteria. But it's ultimately up to you.
Dan
Hi my dehydrator broke down half way through the process i quickly ran down to the shops and purchased a new one and got it back on after about an hour. Is the batch ruined or will it be ok ?
Will
Hey Dan. I am not sure what dehydrator you have, but mine heat the jerky to 160F in about an hour. If this is the case with your dehydrator as well, it should have reached the 160F and be safe to eat even though there was an hour "break" in the drying process.
silasozzie
good video. probably should have removed ring before touching the meat tho'.
Justin Anderson
I'm going to turn a wine fridge into a dehydrator. The fans work to circulate air but it no longer cools. Along with dual fans, it has thermostats so I think it's perfect. I'm going to cut and fit a heat lamp into it. My question is, do you need the air to move substantially or will two small built in air circulating fans suffice in about 2-2.5 cubic ft?
Will
Nice! I would think that two small fans would work just fine. You do not need a lot of air movement, a little will suffice. Just make sure to test whether that heating lamp heats your jerky to 160F. This is an important safety step. If it does not, make sure to pre-heat the meat before putting it in the dehydrator. It sounds awesome!
carole
Hi !! If i store my moose jerky's in jar or ziplocks do i leave in room temperture or refregerator ??
Will
You can keep it either at room temp. or in the fridge. It will last longer in the fridge though.
Beth
Hi Will,
Thanks for putting all of this together, I'm glad I found your site! My husband bought me a dehydrator for Christmas so I can make fruit leather and dehydrated fruits, and I'd also like to try making jerky. One problem though, I have some hand/finger issues, there's no way I can slice all that by hand. Do you think I could do this with a mandolin if it's partially frozen?
Will
Congrats on the new dehydrator! I have never tried using a mandolin to slice meat, but I do not think that it would work that well even if the meat is partially frozen. I think your best bet would be to have your butcher slice the meat for you when you purchase it. They have heavy duty slicers that can easily take care of it. They normally do not charge for this and you can tell them how thick you want it as well. I wouldn't even bother slicing it yourself if you have some hand/finger issues, it's not worth it. Hope that helps!
Bill McCune
You can find packaged sliced beef in the WalMart meat section. It is a couple dollars more per pound than a roast, but it is already sliced to a perfect thickness for jerky. May be labeled as beef for stir fry. My wife and I have used it twice and I sliced a roast the last night. I'll spend the few extra bucks to not have to slice. Just more ass pain than I need.
Will
Ha. I hear ya Bill, slicing can be a pain. I know that the meat market by me has some already sliced eye of round which they call Milanesa. It is labeled, 'eye of round milanesa'. As you mentioned, thinly sliced and perfect for jerky. I have definitely taken advantage of this on days where I couldn't be bothered to slice it up myself!
Tiare
I didnt think that I'd be able to get uniform slices so I had in mind to go to a butcher to have them slice it for me. Another friend recommended a Mexican grocery store. They have lean cuts pre-sliced in exactly the thickness I wanted. The prices per pound were comparable or lower than my regular grocery store for full cuts of meat (not sliced).
Will
Butchers are a great resource for having the meat sliced for you. I believe the pre-sliced meat is for a dish called Milanesa and is normally labeled as such. My local grocery stores often have it available and it is great for making jerky.
Dan
Invest in a "Weston 07-3807 Jerky Slicer" (On Amazon about $100: has a handle on the side to crank/pull the meat slabs thru the 4" wide slot after mounting the base to a table top. Hold the top of the meat strip while cranking the 4" wide pieces being pulled into the Weston hopper's very, very sharp blade wheels. Been using this unit for years. Makes great 1/4" thick slices that looks like nice thick bacon strips. These nice even strips dehydrates evenly in most Hydrators! Note: The "Course" slab portion sometimes doesn't cut thru some of the tuff tendons but can be easily finished with a pair of scissors to separate the tuffer slices after running thru the Weston slicer.
I use Whole Beef Brisket, separate the two unique pieces: The "Course" slab and the "Lean" slab. It will be obvious which is which. Both slabs make yummy jerky, although the Course slab takes more chewing than the Lean slab after dehydrated.
Anyway, trim as much fat off of both pieces using a sharp knife. Then, cut the trimmed meat, perpendicular or opposite to the grain lines into 4" wide strips or less and feed these meat strips into the Weston hopper! Hope this helps. Dan The Saxman (I am a musician)
Tressa
I recently bought Bison Jerky (amazing!) and the store I bought it from had it frozen. It defrosted very quick. I am curious to know how long I can safely store Jerky in a ziplock bag before it's consumed?
Will
It depends whether the jerky was made with curing salt. Here is a page that will help you out... How long does beef jerky stay good?
blackflageoff
I was pondering the pre-dehydrator oven process "curing" process that someone mentioned here... and I came across this https://foodsafety.wisc.edu/assets/pdf_Files/Making_Safe%20Jerky_in_a%20Home_Dehydrator3.pdf
For a safety precaution, it suggests to throw it in an oven preheated to 275º for 10 min after it's been done dehydrated.
The USDA recommends the previously stated "curing" method or boiling it in water or marinade supposedly leaves it a bit dryer and crumblier.
I'm new to this. I use an Excalibur and I'd prefer not to use curing salt, so maybe none of this is needed. Yet, my thinking is that the post-dehydrator quick heat-up-for-safety may come out better, but I am trying tweaks to see what works best for me. But I'm just wondering if there was any thoughts on if it may be better to do it up before or afterwards.
Regardless, love the site and the recipes are awesome and good for inspiration as well. Thanks so much.
Will
I would have to search for the article, but there is evidence that bacteria is more heat tolerable after the meat has been dehydrated. Because of this, it is better to heat the meat at the beginning of the drying process, not after. If you are not using curing salt, I would recommend heating it in the oven before drying. However; I am not sure what Excalibur you have, but the excalibur I have (Excalibur 3926TB Food Dehydrator) heats the meat pretty quickly when it is set at 165F, therefor I do not do the oven pre-heat that often. Glad you are enjoying the site! Thanks for coming by and checking it out!
KevinW
Hi Will,
love the sight !!
Here is the pertinent part of that article:
"The danger in dehydrating meat and poultry without cooking it to a safe temperature first. After drying, bacteria become much more heat resistant. Within a dehydrator or low-temperature oven, evaporating moisture absorbs most of the heat. Thus, the meat itself does not begin to rise in temperature until most of the moisture has evaporated. Therefore, when the dried meat temperature finally begins to rise, the bacteria have become more heat resistant and are more likely to survive."
Here is a link to the full article:
http://www.meatsandsausages.com/drying-preservation/jerky
Will
Thanks Kevin!
Jeff hash
After reading the link , meatandsausage. about dehydrated jerky, it recommends to oven heat to kill possible bacteria that the dehydrator wont kill?
Will
Hey Jeff! If your dehydrator does not heat the meat to 160F, then pre-heating in the oven is recommended. I reviewed some dehydrators you can check out here that DO heat it to 160F which allows you to skip the oven heating. Also check my FAQ page for more useful information.
Bratzdad
If everyone listened to the USDA then everyone in America would be fat! Wait! ..uh, keep up the good work. Do not exceed 165 when making jerky. If you are making overly-thick stuff it will still be moist in the center. Put it in a ziplock-type bag with the corner still open in the fridge for a couple days and let the moisture normalize while it rests and then dry it in the dehydrator for a little longer to finish it. The best method is just let it sit is the dehydrator overnight - skipping the bag - and finish it the next day when the moisture has equalized during the rest.
Benn mandel
Hey Will
Well just put my first batch of jerky in I made slices about 1/2 inch thick ( I like the thicker pc's) I used a teriyaki recipe I found on line and use a cabelas 10 tray dehydrater with temp dial and a on off switch
At half inch thick what amount of time u think about 7 -8 hrs
Thanks Benn new to Austin
Will
Hey Benn! I am not familiar with that dehydrator, but I would check it at 5hrs and then every hour after that if it needs more time. Welcome to Austin!
Pia
Thank you so much Will for your meat jerky dehydration instructions. I just finished a batch of moose meat, perfect for dehydrating as it's very lean....turned out Delicious !
Will
Great to hear! Moose jerky, that sounds fantastic!!! I make venison jerky but have never made moose jerky. One day....
saifuzzal
A very nice recipe for jerky lovers. I never try that before. But I'm sure it will be so delicious.
Thanks Will for sharing.
Bill
Will,
Quick question: Just made our first batch of jerky using your guidance. ..love the jerky! But, when the jerky seems finished by way of time, temp, and the bend/crack test...some of the pieces seem to have a little moisture on them. We then placed them in the oven for 10 minutes for the final step which seemed to bring a little more moisture to the surface of a few pieces. They taste great. ...just wondering if the moisture is a sign of something we didn't do correctly.
Thanks!
Will
It is normal for some moisture to come to the surface during the drying process. This is also more common if using a more fatty cut of beef. If I see moisture while drying, I pat the strips down with paper towels every couple hours. You guys didn't do anything wrong, as long as it passes the bend/crack test and the jerky is dried, you are good to go!
Bill
Great! Thanks!
Stephen
Hey Will, first time making jerky. About 5 hours in and I check the meat using a digital thermometer and the reading came back as 118°. It seemed dry with the bending but worried about temperature. I'm using a game winner 6 tray dehydrator with 158° max temp. I only used one tray for first time. Should be be safe to eat?
Will
Many people make jerky without reaching the 160F internal temperature and are fine, I just don't risk it. (definitely don't want food poisoning!) Wish I could tell you it's safe, but there is no way to tell. I have not used that dehydrator and am not sure if it reaches the 160F, I would think not if the max temp is really 158F. I am surprised that it only reached 118F as well. It's best to wrap a thin piece of meat around the thermometer before you start drying since trying to insert a probe in the middle of a thin piece after it is dry is extremely hard and doesn't result in the true temperature most times. You can always throw it in the oven for 10 minutes at 350F to make sure it is heated through. From now on if I was you I would pre-heat in the oven before drying.
tkc
When using ground beef in a Nesco dryer I should go for 160F. The strips I have in there are a quarter inch thick. Roughly how much time should I expect for this to dry?
Will
I would let it go about 3 1/2 hours and then start checking it every half hour or so until it is finished. My Jerkyholic's Original Ground Beef Jerky took 3 1/2 hours to be finished.
George
Thank you, Will, for everything you've put into this site. It has been really informative for me. It seems Nesco is the brand to go with. But what do you feel about investing just a tad more (based on Amazon prices) for the 77? Seems the same as the 75, minus a tray, but is digital. Or the 1040 for the bigger motor? Though some reviews say jerky time is still ~4 hrs or so with it. Thanks!
George
Sorry, I meant to post this on the dehydrator comparison page. Must have hit the back button by mistake.
Will
Glad you like the site George. I have not used the Nesco77 so I can not 100% recommend it. I would assume it is well made like the 75 just with the digital face like you mentioned. I DO like the timer. Since jerky takes hours to make, most of the time you are out of the house doing other things while it is going. So if you are a busy person and don't mind spending a little more money, try the Nesco77. I do not see much benefit of going with the Nesco1040 unless you are making A LOT of jerky and need to expand to 15 trays or so (which is a lot of jerky to make at once). If you do stick with the 75, here is a little gadget that I use for my dehydrators that do NOT have a timer. It's not fancy, but does the trick. Let me know which one you get and how you like it!
Ben Glover
Will,
I've been doing beef or deer jerky for the last 15 yrs. I use the Nesco and added trays I got it from Walmart. Normally I used to use London Broil til it got so high. But would slice 1/8-1/4 at most , marinate in Moores Original Marinate any grocer for 3 days, then lay out on 12 trays. I would start with 3 lbs of meet and rotate. First in the freezer to stiffen it while slicing, then marinate 3 days, Sprinkle with a mixture of Season salt, Black Pepper, Accent (no MSG). Actually used to taake and use 2 forks to juge the meat which is not really necessary but punched in the meat, then place on tray (much touched) then cooked 9-12 hrs over night take off and glad bag it. We have actually used it up to month, month and a half, sent it to Missionaries in Russia. Guys son showed me how one day and I got hooked. I'd buy up to 3 rotations at a time, then start again each day I could put a new batch on each night 2 times a week ending up with 6 batches a week. Love this stuff, just need a decent price on the meat. Hate the commercial rubbery and winey taste most produce.
Will
That's a lot of jerky making! I agree that making your own jerky is way better than store bought... you just can't beat homemade beef jerky!
Kara Richardson
I've been making deer jerky all my life and just recently started substituting beef eye of round, as i crave it all year long and hunting season only supplies so much venison lol. I can't believe I never thought to freeze beforehand with beef! Thank you for the reminder =) I had the misfortune this last time of getting a roast that was terribly marbled for jerky. The end result was that I had uneven slices from cutting out excess fat (varying between 1/8th inch ans 1/4th). I came here to see if there was any extra precaution for my thicker slices, which are obviously taking longer. I've had the dehydrator running for 4 hours now, and the thin slices are definitely done, but the thick ones make me nervous. I have a presto dehydro that has no temp settings, and I've had it for at least 3 years. Do you have any advice? Should I cook it in the oven for a bit to be safe?
Will
If you are not using any type of cure, putting it in the oven to make sure it gets over 160F is a good idea. Better safe than sorry!
Terry L Watters
Beef jerky holds bacteria therefore after dehydration I always place my jerky in the over at 200 degrees for just a couple of minutes. its absolutely amazing.
Mark Walker
I've got the Presto 06301 and I love it. I purchased several more screens and a few leather trays that were being sold at Walmart. Got at half price. I've made four batches... two London Broil and two 93% leave ground beef. Staring at my jar of goodies in front of me. My dog is looking at it too!
Dan Davis
Good article. I'm running my dehydrator right now with another 2lbs of eye of round using Alton Brown's marinade off the Food Network site.
If you're looking for an inexpensive and decent dehydrator, check Amazon for the Presto 06301.It comes with a bunch of trays, but you can buy more to stack on top. The trays fit together really well. It's round, so the drying air is well circulated. It's got a great digital interface, with timer (both count-down and elapsed use) and temp scales easy to adjust. I used my ThermoPen to check a container of water in the unit for temp changes at all settings (also a great way to get that plastic smell out of the unit before actually using it to dry food), and the temps were only off by about 2-3 degrees at each setting across the board. Although you can't recalibrate the thermostat, it's easy enough to just add this to the stated temp. At least it's consistent!
This unit does 160F at the high end, and that's where you want to do your jerky. I've seen sites say 135F for longer, but you need to get the meat to that higher heat point if you're going to skip the oven "curing" step (actually, putting the wet meat in the oven FIRST and bringing it to 160F is recommended by the USDA, and THEN putting the meat in the dehydrator at 135+F until it's cracking but not breaking). If you're using a meat 'cure' which has nitrites (not nitrATEs) in your marinade, you can safely skip the oven step, but I don't like the taste of it. I'd rather take the risk. 🙂
Aaron Miller
Quick question. My dehydrator has no temperature controls. So instead I ran it for ten minutes and put in a thermometer to see how hot it gets. The thermometer put it at 190. How long do you think it would take to dehydrate at that temp? First time making jerky.
Aaron Miller
Its actually the FD-37 Food Dehydrator. I know its not the best. My in-laws lent it to me. I wanted to try out dehydrating stuff before going in and buying my own unit. But for the time being, what do you think?
Will
That's great! That unit will get you started! Dehydrating time heavily depends on how thick you slice your jerky. I would slice it about 1/4" thick and dehydrate for 3 1/2 hours. Take a piece out and let it cool for about 2-3 minutes. Bend the piece of jerky; when done it should bend and crack but not break in half. If you slice the meat WITH the grain it will not crack as much as if you sliced the meat AGAINST the grain. I like to tear the jerky in half lengthwise when its sliced with the grain. If the meat tears and has white strands, it is done. If it's not done, keep dehydrating for another hour and check again. Most jerky I dehydrate is done within 4-5 hours. Let me know how it turns out.
Aaron Miller
Wow. What a taste. That stuff is epic. Marinade was bomb. If you want to try it. I am officially hooked. The London Broil was very good. I wanna try some round next however. That or the Sirloin Tip. Need to buy ingredients in bulk from Costco too. The dehydrator worked fine. No need to buy one until the in laws want it back. You found a new regular to your site.
Michael Alan Walker
do you use the masterbuilt smoker box add on with your master built 30 inch smoker
Will
I do not use the smoker box add on with my Masterbuilt (I'm guessing you are talking about the cold smoke box?). I just turn up the heat when I add chips to get the smoke I want and then turn it back down afterwards. I have been wanting to try the cold smoke box, but haven't ordered it yet. If you use it, let me know how it works!
Josepph Puleo
i would like to know if i can use a liquid marinade for beef jerky i will be using a nesco dehydrator for the first time. any information would be welcomed.
Will
You can definitely use liquid marinade when making beef jerky. Check out my Beef Jerky Recipe page for some marinades.
Mariann
I going to make jerky for the second time in my life. The first time when my girls were learning about pilgrims and Indians more than 30 years ago! Doing it in the oven. Now I'm using a dehydrator and friends are telling me to grind the meat for easier chewing and faster drying times. How do you feel about this method?
Will
If you are buying meat from the store, just buy ground meat and follow my directions on making ground beef jerky. There is no reason to do the extra step of grinding unless you are using meat you have harvested yourself and it needs to be ground up. With that said, I prefer whole muscle jerky. Just slice it against the grain and tenderize with a meat mallet before marinating and it shouldn't be too chewy! It should only take about 4-6 hours to dry in the dehydrator.
Bratzdad
Do not dry jerky at this temperature. The best temp I've found is 155 degrees max. Anything over 165 and the meat is no longer jerky - it is COOKED! he proteins in beef denature (cook) at 165. I've made hundreds of pounds of jerky using the venerable Nesco FD-60. I have four of them now with enough expansion trays to do about forty trays at a time. Usually my batches are a more moderate 12-15 lbs at a time which will take two machines with eight to ten trays each. I pack them a lot tighter than this guy shows here. The spacing comes after the jerky has dried a little. I flip the trays about halfway through by putting an empty tray upside down on one full of beef and simply flipping it upside down. I have a large family and the kids STILL bug me to make jerky and send it to them even though they moved out years ago. I hug plenty for myself though.
Justin
How long does your jerky take at 155 degrees?
I have the Nesco FD-80 (the square one) and I have tried everything. I have dried for 4 hours all the way up to 18 hours and my jerky always ranges from too tough to even chew to brittle like a potato chip. I got the Weston Jerky Slicer so at least my cuts will be even and I am marinading some meat right now.
Will
It definitely slows down rising in temperature the closer you get to 160F. I have not used that dehydrator, so it might not get your jerky to 160F. My jerky normally takes around 4 hours to dry.
Sharon
I have my meat marinating but I got called out of town and can't dehydrate it. Can I freeze it in the marinate sauce and thaw it when I get home and dehydrate it?
Will
Sorry for the late reply. I have been on a 4 day back country camping trip without any service. You can freeze it and make it when you get home. That should be fine.
JG
Jerky is a matter of taste and texture. Carne seca (dried meat) is sliced thin, very dry and brittle. There is no right or wrong.
Daddio7
I have a cheap Magic Chef dehydrator. No thermostat and I measured the temperature at the air outlet at 180 degrees. I use a cheap meat slicer to slice cheap (notice a trend) cuts of beef. It flexes so some slices are paper thin. Mmmm crispy!
The bottom racks get hotter then the top so after a few hours I shift them top to bottom and also turn over each piece. Another few hours and they're done.
Brian
I always do 155 for 7 hours I normally use deer meat , but it’s the same when I use beef let it cool before bagging it up and keep it in the fridge
Luis Fernandez
I certainly agree.... not cooked meat .... just dry.... I made mine in a Cuisinart Dehydrator.... temp goes up to a 140 F in high max..... more tan enough.... my batches are smaller... 5 lbs. today I am trying 4 receipts... Canadian Beef Rub, Cajun Rub, BBQ Rub... and my long time favorite... Italian Dressing from Kraft ( Pricesmart is just as good.... I believe it is the same and cheaper...). I will let you know the turn-out.... since I am confined at home for the Corona Virus... I am looking for ways to be entertain myself... greetings from El Salvador, Central America...
Will
Making jerky is a great way to pass the time when staying inside because of a pandemic! I'm looking forward to hearing how this turned out. Let me know Luis!